For some organisations, using a budgeting tool is an annual event. For others, managing their budgets is an ongoing process of revising rolling forecasts. Using Calxa as your financial budgeting tool, these tips will help you through a pain-free budgeting and forecasting process.
Table of Content
Tips for Getting Started Quickly
Budget Versions and Re-forecasts
Getting Started Checklist to Use Calxa’s Budgeting Tool
End of Budget Spreadsheets
Anyone who started a finance or accounting career at any time since 1980 would be familiar with creating budget spreadsheets. Budget spreadsheets were a great advance on the manual paper systems that preceded them. After all, it saved us many hours in both the preparation and maintenance of budgets.
However, budget spreadsheets are no longer the perfect tool for budgeting. The downside of their great flexibility is that they give you unlimited scope to make mistakes. And, let’s face it, the best of us make mistakes from time to time. Notably, mistakes can be very hard to identify and track down in a budget spreadsheet.
There are best-practice guides on implementing and managing spreadsheets but you have to be dedicated to follow them and there’s always the temptation to take shortcuts when you’re in a hurry. And at some point, in the budgeting process, there will be deadlines and time pressures. And inevitably, those shortcuts come back to bite you later.
Budgets are inherently complex and go through several revisions. While budget spreadsheets can be fantastic for simple operations, the more complex they become the greater the risk of something going wrong. The efficient way to do budgets in the 2020s is with an application like Calxa that connects to your accounting system.
Budgets in Calxa
One of the strengths of an online budgeting tool such as Calxa is that it provides structure. Starting from the list of accounts from your accounting system, whether that’s Xero, MYOB, QuickBooks, NetSuite or something else, you can be confident from the start that when you come to compare actuals to budgets, everything will line up perfectly.
While Calxa doesn’t give you the wild ‘you can do anything’ flexibility of a spreadsheet, there are some ways in which it is even more pliable.
One key example there is in managing multiple versions of a budget. With Calxa it’s easy to keep track of your original, approved budget, your current forecast and various drafts and alternate scenarios.
In the report filters you can easily select which one to report against so that you can distribute copies. Once you’ve settled on the final, approved version, it’s a simple click to lock the Approved Budget and make it read only. Then work on your forecasts for the rest of the year to reflect changes to your situation.
Creating Budgets: Tips for Getting Started Quickly
When you’re getting started on your budgets, you don’t want to mess around. Here’s 3 ways to start in Calxa’s financial budgeting tool:
1. Use the Budget Factory
You’ll find this under Budget Tools and it’s the bulk editor for budgets.
- You select a source for your data,
- then a destination budget and year(s),
- make some adjustments,
- review and confirm.
When starting out, use Actuals from your previous financial year as the source, the Initial Budget for this year and next year as the destination. Set a percentage increase (or decrease) for Income, Cost of Sales and Expenses. These can be different values each year.
Once saved, you’ve got a draft budget that you can then go and fine-tune.
We recommend creating a budget for at least the current and next financial years as reports like the cashflow and balance sheet forecasts will run over into next year.
In future years, you can set the source as either the current year actuals (plus budget to the end of the year) or the current year budget. The Budget Factory is a great wizard to get your budget started in seconds.
2. Sync your Accounting Data into Your Online Budgeting Tool
If you already have budgets in your Xero, MYOB or QuickBooks file, don’t waste that effort! Under Settings, Organisation Settings, General tick the option to include budgets and specify which budgets to bring in. The next time you sync, you will bring them into a budget version called Xero Budgets, QuickBooks Budgets or something similar. Note: this is one of the greatest advantages of using an online budgeting tool.
Calxa will bring them in and keep them read-only and update them with future changes from the accounting system. If you want to edit them (and we recommend that), use the Budget Factory to copy them from the accounting system budget to a Calxa budget. Then you will be able to:
- Make changes,
- Add Balance Sheet accounts
- And get the full flexibility of your budgeting tool.
3. Import from a Spreadsheet
For those of you who have had to suffer with spreadsheets for budgets, Calxa can import your existing information. Under Budget Tools, Import, you can select your spreadsheet, match the columns, and bring it in. The basic format is a header row at the top with columns for Business Units, Accounts and monthly data. There’s an option to export a template to show the default layout.
The column names don’t need to exactly match but things like account names and numbers do. Once you’ve imported your budget, you have the ability then to edit it further in Calxa. Furthermore, you can then include it in all your reports.
Managing your Budgets in the Budget Builder
To control what you see on the screen and focus just on those accounts you need, when editing your budgets, take advantage of:
- Layouts
- Options
- Search and Filters
- Bulk Actions
Calxa Budgeting Tool – Use Budget Layouts
Layouts give you different views of your budgets. Most of the time, you may be quite happy with the traditional accounts on the left, months across the top but that’s not always the best way, especially when editing or fine-tuning your budget. Change the layout to improve your productivity further.
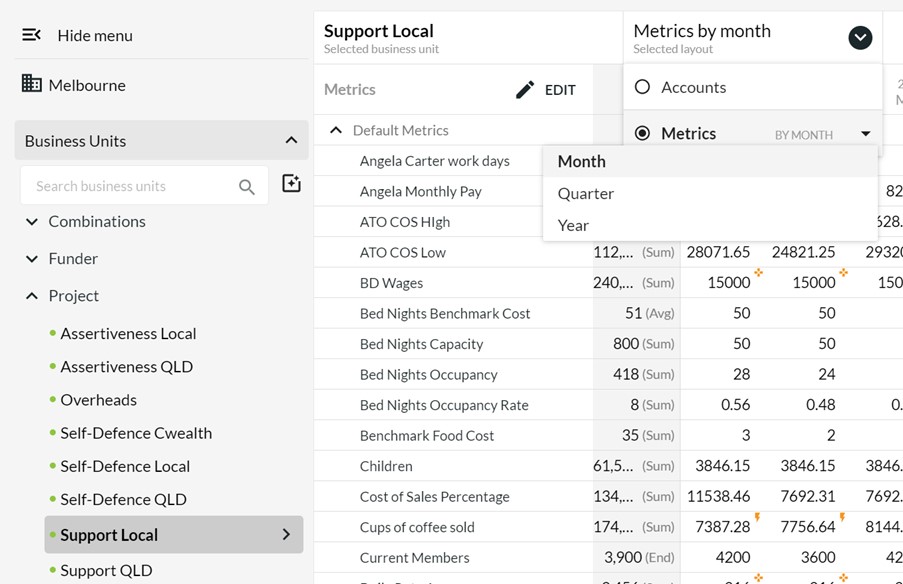
Most of these layouts you’ll manage from the left menu. Once you know your way around it, you can choose to hide the menu or pin it to keep it in place.
Layouts by Account or Metric
Choose your organisation or business unit in the left menu and you’ll get choices at the top now for Accounts or Metrics by month, quarter or year.
This is especially useful if you’re working on a longer timescale. You can easily show multiple years and edit them quickly. Edits made to a quarterly or annual column flow through to the months below.
- If there is nothing there, Calxa will spread the new amount evenly.
- However, if there are existing numbers, it will adjust them proportionally.
- Also, editing the total column has the same impact across the whole time period displayed.
In addition, you can collapse the rows in your budget (see Bulk Actions below for more detail) to show totals for Income, Cost of Sales, Expense. In the case, where your filter is an Account Tree, you can contract any Header row. Then edit the total and the results will be distributed proportionately over the detail accounts. This helps you make quick changes at a high level.
Changing your layout to Metrics give you the option of adding non-financial Metrics. You can use these as drivers for budget formulas or as components in KPI formulas. If you want to calculate your income from the number or services provided and the price of those services, simply create a Metric for each. Then, add budgets and later your actuals. After that, in the Accounts view, add a formula to calculate the revenue. Our article on Payroll Budgets has more examples.
Business Unit Layouts
Select an Account or Metric on the left side menu and you can then see each of your business units for just that account or metric. This makes it very easy to set the same formula across each business unit or to reallocate a budget from one department to another.
Read up on Budget Views & Layouts in this help article.
Calxa Budgeting Tool – Use Options
You’ll find the Options icon along the top right of the budget builder grid. This is the place to make some changes to how things are displayed:
- Show account/business unit numbers: Turn off if you work with names rather than numbers. Turn it on if you prefer numbers.
- Show empty rows: Turn off to hide rows with no data in the date range displayed. If you do need to zero a row, the quickest way to do this is to put a 0 in the total column. Also, turn this option back on to show the empty rows so you can enter new values.
Tip: Use the keyboard shortcut and press e anywhere in the budget grid to toggle empty rows on or off. - Account Tree: Use the same layout that you use for reporting to edit your budget. This is particularly useful if you are editing total rows.
- Display numbers as: Set to Thousands or Millions if you deal in large numbers. This is useful not just for big organisations but also for those who deal in currencies such as the Indonesian Rupiah. You have control over the number of decimal places to show to get the detail you need.
Calxa Budgeting Tool – Use Search and Filter
The Search icon opens an extra row at the top of your budget where you can either search for accounts (or business units if that’s what’s in your layout) or filter by type or header account.
Search by name or number to find matching accounts. This is great when you have a long chart of accounts and want to find just one to edit it.

Filters let you restrict the view to specific account types, for example:
- Collapse the header accounts
- Select the ones you want.
If you have chosen an Account Tree in Options, you’ll be able to filter by the headers in that tree.
One more tip on filtering your budgets: remember that you have flexibility over date ranges. The default is the financial year from your accounting system, but you’re not limited to that. Use the pre-set options to the Calendar Year, Current Quarter or Next 6 months. You can also just select a start and end date, and this works well for a project budget that runs across financial years.
Calxa Budgeting Tool – Use Bulk Actions
Use the Bulk Actions menu to expand and collapse the header rows in your budget. This is useful when you want to hide most of the rows and just focus on a few, but still see the change to totals like Net Profit. It’s also very handy for editing at the header row level. Just make changes to the header and they will flow through to the rows below proportionately.
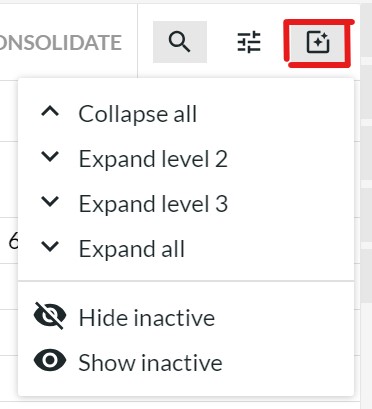
Tip: If you ever want to quickly wipe a budget for any date range, choose the months or years you want and then select Collapse all. Enter a 0 in the total column for each header row.
Hide and show inactive displays or hides your inactive accounts or business units. If you ever have the situation where your totals don’t appear to add up, show the inactive accounts and check if you have budgets applied to them. Use the keyboard shortcut I to quickly toggle this on or off.
Formulas in Your Financial Budgeting Tool
It’s undisputed, that one of the things we all love about spreadsheets is formulas. We deliberately made the formulas in Calxa simpler than a spreadsheet and added some structure. The reason for this is, that the downside of spreadsheet formulas is that it’s easy to make mistakes and often hard to find them.
When you are adding a formula to your budget in Calxa, click the account name (or metric name if you’re setting a formula for a metric) to select the entire row. From there click the Formula button.
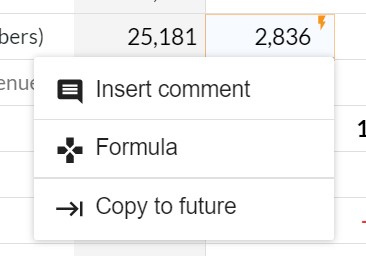
If you have created a formula in one month and want to copy that across to the remainder of your view, use the ellipsis menu at the bottom of the cell and Copy to Future.
Our article 7 Clever Things to Do with Budget Formulas will give you some great ideas. In the meantime, you can find the help note on using Formulas in Calxa’s Budgeting Tool.
Repeating Formulas
Use repeating formulas when you want to calculate something based on a number of days or weeks. It could be:
- A salary that’s paid every 2 weeks
- Or a count of the number of workdays.
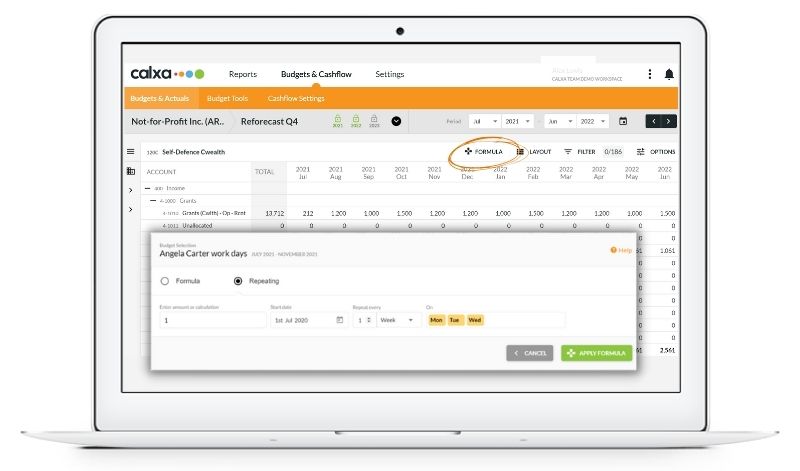
For a monthly repeating amount, simply use a standard formula with a number on the left-hand side:
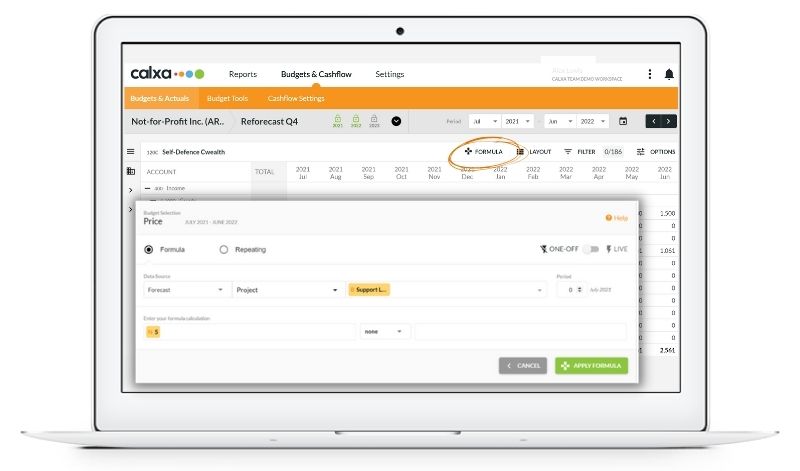
Working with Formulas
Doing formulas in this financial budgeting tool is quite flexible:
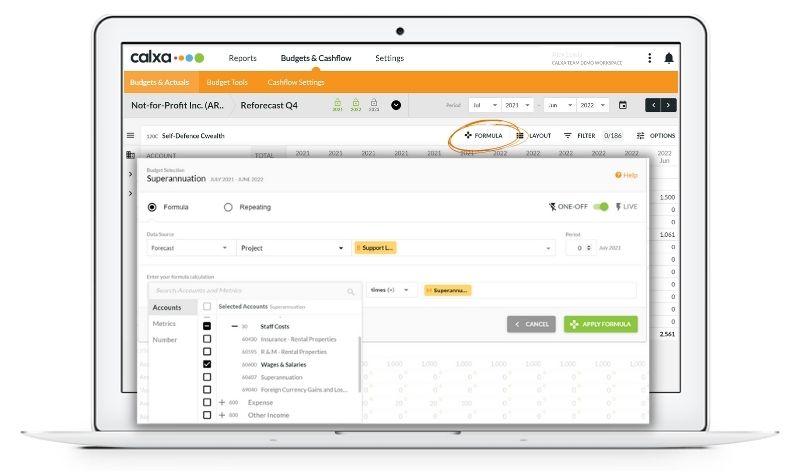
- The formula calculation, the bottom row, can take either an account, metric or a number on each side and an operator in the middle.
- You can select multiple accounts, or a header account to get the result you need.
- The data source can be Actuals, the same budget version or another one.
- The period on the right can be any month, relative to the selected one.
Calculating superannuation or pension fund amounts as a percentage of the salaries is a good example for this.
- Use -12 to pick the same month last year.
- Set the formula to Live to automatically recalculate when the underlying data changes.
Copying Formulas
A quick tip for you: To copy a formula, simply include at least one month with that formula as well as the months you want to copy it into.
For example, to copy from this financial year to next, display the last month of this year and all of next year. Select the Row, the Formula and then Apply.
Or, include the formula in the first month of the display, as above, and then use the ellipsis menu at the bottom of the cell and Copy to Future.
Simple!
Creating Your Own Accounts in Your Calxa Budgets
Sometimes you need more flexibility than the structure of your chart of accounts gives you.
Unlinked Accounts
For example, you may want to budget for some expenses that might happen but you don’t want to add the account to Xero or MYOB until it does. That’s a great time to add an Unlinked Account in Calxa.
- Add it in, include it in your budgets and use it to help you make decisions.
- In the end, if you decide to go ahead with your plans, you can push the account from Calxa to your accounting system.
- If not, it just lives in Calxa and you haven’t cluttered your accounts.
Sub-Accounts
Sub-accounts work well when you have one account in the accounting system but you need more detail for budgeting. An example could be Wages and Salaries where you have different classifications of staff, each with their own method of budget calculation.
- Simply add sub-accounts to the Wages and Salaries account
- Now, use budget formulas on each of those and they will automatically roll up to the total line.
Use sub-accounts when you want to total a number of rows and you don’t need to report on the detail. If you do need the detail in your reports, use unlinked accounts and then a formula in the main account to summarise them.
Managing Forecasts and Budgets in Calxa’s Budgeting Tool
One budget is never enough but how many is too many?
Managing Budget Versions
You can manage and create different versions in the Budget Manager. To do this, you will find the Budget Manager under Budget Tools. Be aware that a budget here contains all business units for all years. We recommend that you have an Initial Budget or an Approved Budget and a Current Forecast that you reuse continuously.
Using the same budget versions for these will simplify your reporting and budgeting immensely. Having these streamlined editions will give you options to work more efficiently in the long run. It opens up great flexibility, for example:
- Report bundles will continue to work from one year to the next without changes
- Multi-year reports comparing actuals to budgets are set up once and work over time
- Spanning reports across financial year-end work on the same budget version
- Organisation Groups won’t need to be changed or copied
- You can use the Budget Factory to copy data from one year to the next
- You will keep your formulas intact
Adding Scenarios to your Budgets
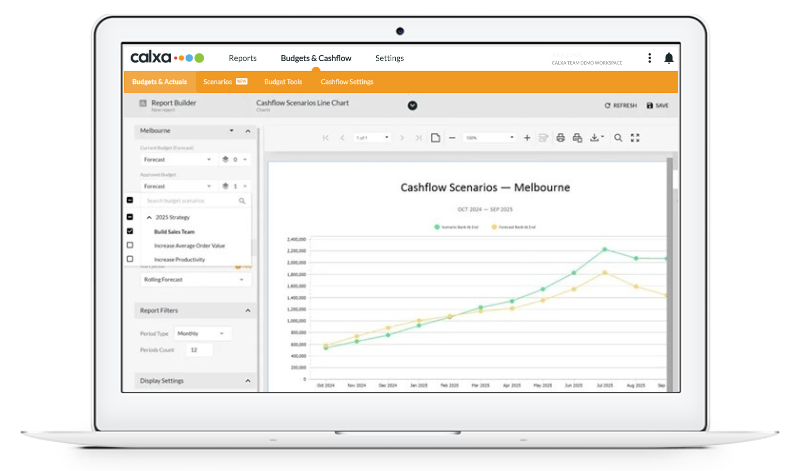
When you want to create new scenarios, you can add them as layers within the Scenario Manager (under Budget Tools). Create scenarios for all the potential changes you want to make in your business and then see the effect of combining them by turning on Preview Mode.
Editing scenarios is almost the same as editing a budget. You have the same shortcuts and formulas. The key distinction is that you should only include the changes you expect, what will be additional (positive numbers) or reducing (negative numbers) the original budget. A scenario could impact all or most of your accounts and business units but it could also touch just one or 2 of each.
When you have edited the scenario to include the numbers you want, choose preview mode to see how it will affect your ongoing profitability. Will it make things better or worse?
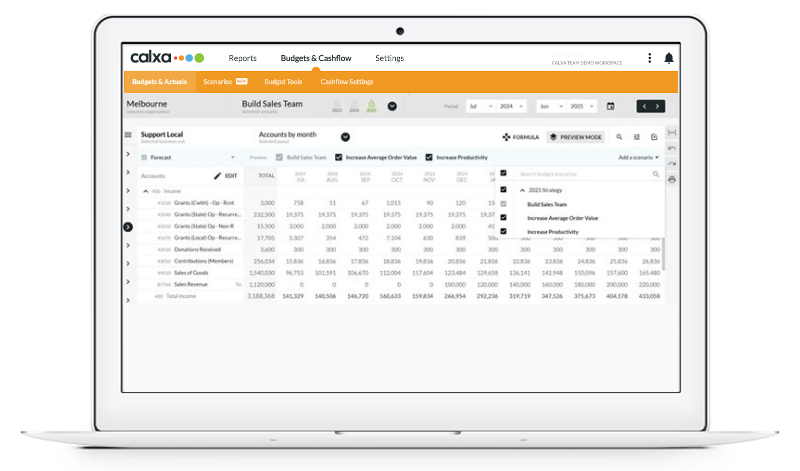
Then do the same in reports to try out different combinations. The Cashflow Scenarios line chart is especially useful to preview the affect on your cashflow of different combinations of scenarios.
Bringing Year-to-Date Actuals into a Forecast
When reporting on actuals for the past months and forecast for the rest of the year, you could use the P&L with Projected Total reports. However, some people like the forecast itself to be updated to include Actuals so that it represents the history plus the latest forecast of the future.
You could use the Budget Factory to update the Current Forecast but this will over-write your formulas. Instead, export the Actuals for year-to-date (Budget Tools, Export). Then simply import them into your Current Forecast. It will over-write past periods but leave the formulas intact for future months (and years).
Sharing the Load with the Team
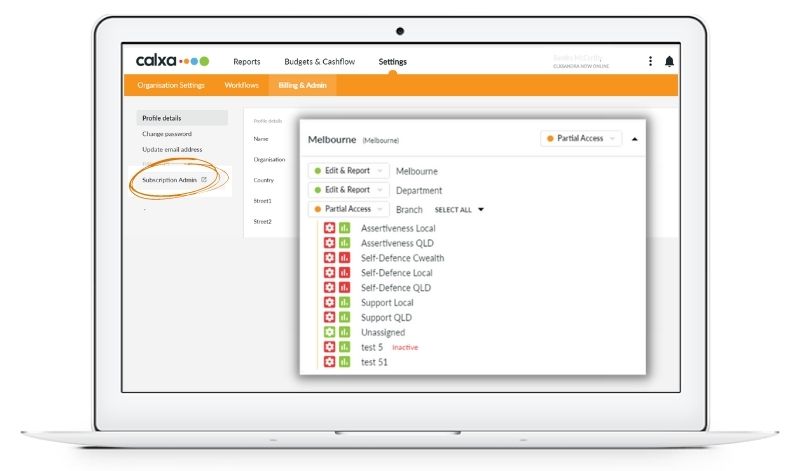
Budgeting shouldn’t be a lonely process! Your Calxa subscription includes unlimited users. Invite your colleagues and give them permission on the business units they need to edit. This way you can control who does what.
- Some of our customers give department managers access all year round to run reports any time they want.
- Others add them at the beginning of the budget setting period, give them access for 2-3 months and then remove them. At this point, the Finance Team reverts to distributing reports for the rest of the year.
Choose the option that works best for your organisation culture – or experiment!
Key Budget Reports
There is a plethora of report templates in Calxa’s budgeting tool. More than 180 templates and counting. So this makes it important to understand which format works for which use case.
Print your Budget
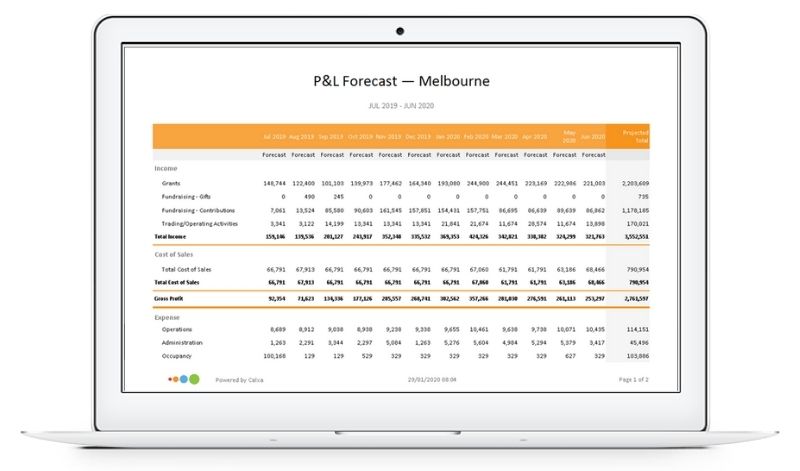
The best way to print a budget is to use the P&L with Projected Total (12 Months) report.
- Use the Print button to the right of the Budget Editor to pop up the Report Builder with the right settings.
- Set the starting period to This Financial Year Budget.
- Now, filter for the business units you want to include and you’re ready to roll.
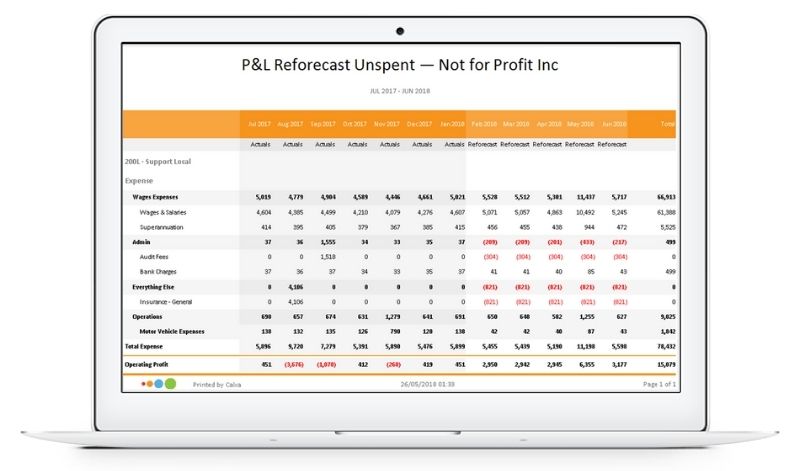
Unspent Budget
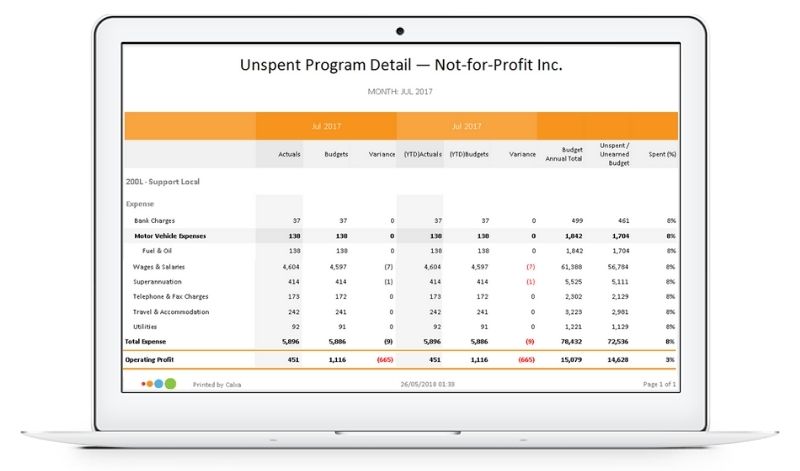
Search Unspent in the Report Builder and you’ll see the Unspent Budget reports.
- There’s one with Year to Date and Full Year
- Another one with Current Month, Year to Date and the comparison to the Full Year Budget.
Reforecast
Searching for Unspent or Reforecast will reveal the P&L Reforecast Unspent to meet Budget report. This shows Actuals for past periods and recalculates the remainder of the year to show what needs to be done to meet the annual budget.
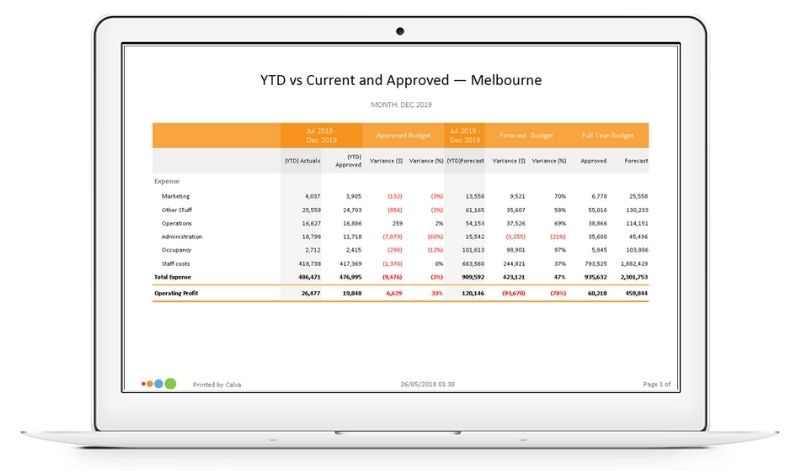
2-Budget Reports
Sometimes you want to compare your Actuals to your Approved Budget and to your Current Forecast. Try either the Actual vs Current Budget (2 Annual Budgets) or the YTD vs Current and Approved Budget Versions.
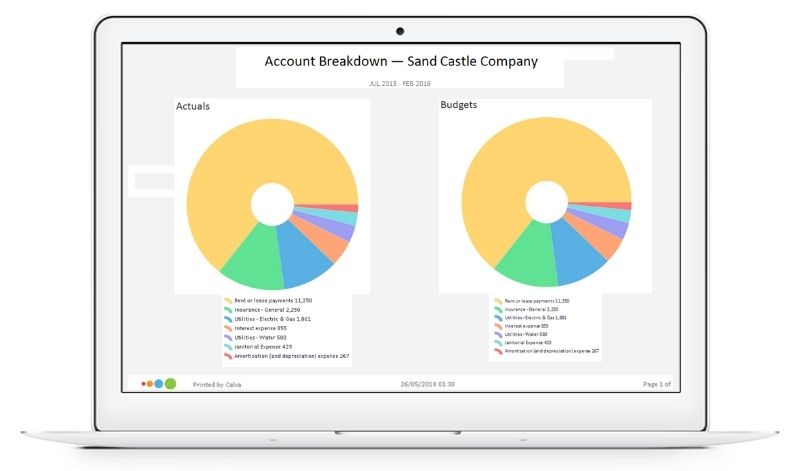
Account Breakdown
To see which projects are consuming your expenses or contributing to income, try the Account Breakdown pie chart. Note that you can use an Account Tree with this chart to get the level of detail you need.
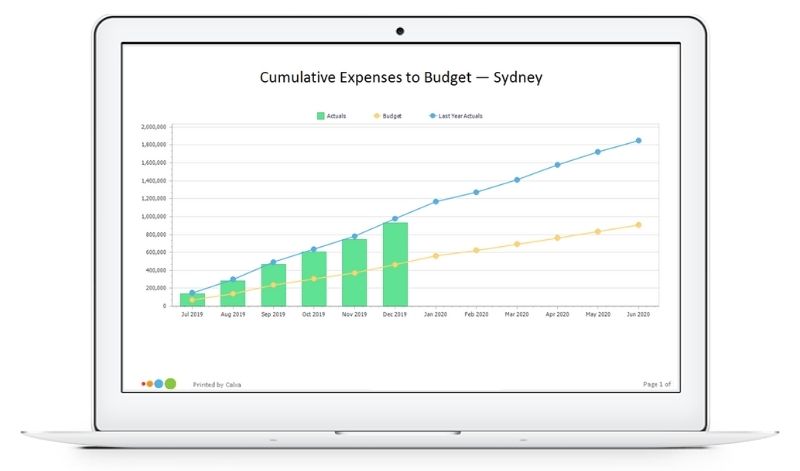
Cumulative YTD Progress
To measure your year-to-date progress, try the Cumulative Actual to Budget chart. The bars show Year-to-Date actuals, the lines show the current year budget and previous year actuals.
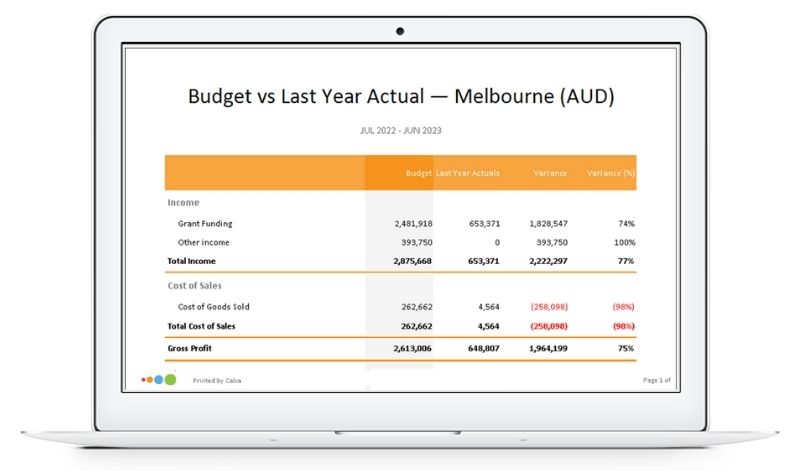
Budget vs Last Year Actual
When your manager or board is approving the new budget, they’ll often want something to compare it to. Calxa provides a selection of reports comparing the new budget either to the prior year actuals (or forecast if not complete) or budget. You can do this either for the whole year or month-by-month, depending on your needs.
Getting Started Checklist for Calxa’s Financial Budgeting Tool
There are so many advantages in using an online budgeting tool. To enjoy the flexibility and power of Calxa, we suggest considering these areas:
- Budgets by organisation or individual Business Units
- Creating Budgets using the Budget Factory, syncing from your accounting system or importing existing spreadsheets
- Learn to select the right views, layouts and filters for efficient budget editing
- Set up driver-based budgets using formulas
- Manage budgets, forecasts and scenarios
- Choose the right budget reports for your audience
If you are still using spreadsheets but want to consider a budgeting tool change, have a look at Calxa’s 30-Day Free Trial or book a personal session.
