Unit costing is important for business and not-for-profit organisations alike. As a business and not-for-profit organisation, you probably have an idea of how much your projects and programs cost to run overall. And, no doubt you have a very good understanding of how much income or block funding your organisation requires to support these programs.
Businesses find their industries more competitive than ever. Whilst for not-for-profits in particular, the funding environment is changing. This change isn’t just caused by the introduction of the National Disability Insurance Scheme. Funding generally is moving in a more flexible, market-driven direction. In this new environment, individuals receive funding and then pay for individual services. This puts the pressure on not-for-profit organisations to know how much to charge for these services in order to remain operational.
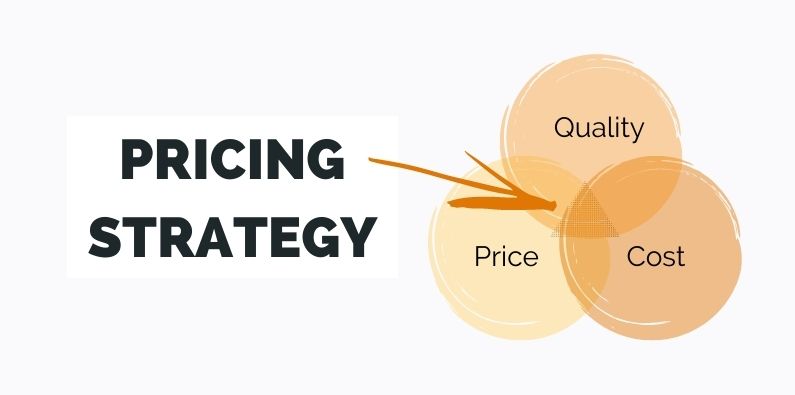
Understanding the cost of activities is important in adapting a market based pricing strategy. For example, social services organisations are realising they need to work out a cost per participant for their services and implement budgets and cashflow forecasts based on these figures. This is where unit costing comes in.
About This Unit Costing Guide
Budgeting, cashflow projections and funding changes can all start to seem a bit overwhelming. You may feel time spent on this area is taking you away from your organisation’s main focus.
Unit Costing for Beginners helps simplify the situation for you. The guide takes you through the basics of unit costing and why it’s now important for not-for-profits and small businesses, before outlining how you can link your accounting data with Calxa for easy budgeting and reporting. It then provides specific information on how you can create a unit cost KPI for services in Calxa and track this important KPI through reports and charts.
In other words, this guide helps you work more efficiently and effectively — meaning you can get back to the more important areas your organisation works on.
Highlights Used in This Guide
You will find some highlighted areas where we want to draw your attention to certain types of information. Here’s what they represent.
Remember
Important ideas and concepts you’ll want to remember are highlighted so that you can use them when you don’t have this guide in hand.
Tip
A highlighted tip suggests practical strategies for saving time or working more effectively.
Where to Go from Here
You don’t have to start reading at Chapter 1 and continue straight through to the end of the guide.
- If you’d like to get a bit more of an understanding of unit costing and why it’s suddenly so important, feel free to head to Chapter 1.
- For help with preparing your accounting file and checking you can integrate with Calxa, flick to Chapter 2.
- For setting up Calxa, see Chapter 3.
- If you already use Calxa and want to jump into setting up your unit costing KPI, go straight to Chapter 4. Simply choose the topic you need and dive in!
Chapter 1: Making Sense of Unit Costing
In This Chapter
- Understanding the basics
- Choosing your costing options
- Deciding on the right level of activity to track
The goal of unit costing is to understand the costs of your products, services or activities. It’s not rocket science and it’s a process that has been used for many years in manufacturing and other industries. What’s new is its relevance to the Not-for-Profit (NFP) sector in Australia.
The change in the funding environment, particularly in aged care and disability services, has led to a growing need for service providers in those sectors to better understand the costs of the services they provide. The shift to Consumer Directed Care and the introduction of the National Disability Insurance Scheme (NDIS) has made it more important than ever for service provides to ensure that they are at least covering costs in all the services they provide.
The shift to payment for individual services (rather than the government distributing block grants) also has implications for your cashflow. What was once locked in and certain can now be variable and hard to predict.
This chapter covers the basics of unit costing and will get you started. Later, we’ll show you how you can better manage your cashflow as well.
The Importance of Unit Costing
As we mentioned in the introduction, unit costing has been used for many years in businesses. Sometimes, especially in manufacturing, this requires complex systems to measure all the inputs required to produce something. Other times, in retail for example, there is a direct one-to-one relationship between what is bought and what is sold and calculating the unit cost is simple.
Unit costing is important to businesses so that they understand which products (or services) are profitable and which are running at a loss. Sometimes a business will choose to persist with a loss-making product or service (when introducing it to a new market for example), but they will want to know what the loss is and make a conscious decision to accept it in the short term.
Until the last few years, the NFP sector hasn’t needed to worry too much about unit costs. Funding traditionally came in the form of a block grant (and still does in many sectors) so the focus was more on reporting what the funds were spent on and the impact on participants.
When payments are based directly on services provided, the world changes and information systems need to change to meet the altered needs of the organisation. In Australia, this change has been most obvious in the disability sector with the introduction of the National Disability Insurance Scheme (NDIS) and the spread of Consumer-Directed Care (CDC) in the aged care sector.
Even those NFPs who are still grant-funded are not immune from the needs to report to their funding providers on the unit costs of the services they provide. There’s not such a direct relationship to revenue but governments are taking more of an interest in the detail of what they are paying for.
Remember
These changes have brought many NFPs into the world of marketing services to clients and, in many cases, there are fixed or maximum charges they can apply – so it’s vitally important to understand the costs of those services.
Tip
In the future, many experts expect that, at least in some areas and for some services, prices paid by individuals will be more flexible and market-driven.
The Economics of Pricing
When a central authority sets the price, or the maximum price, for the service you provide (as does the National Disability Insurance Agency (NDIA) in Australia), as a provider of that service, you need to ensure that you can provide it at a cost lower than the set price – most of the time if not all of the time.
Any organisation consistently providing services where costs are higher than revenues will become unsustainable in the long term unless there is alternative revenue to cross-subsidise the service.
Remember
An organisation that consistently loses money will not survive long in the current economy.
It’s relatively easy to estimate at least the direct costs of a service that is provided one-to-one, such as a carer visiting a client for 4 hours every week. Some activities, such as those services provided to a group of clients, can be more complex and we’ll provide some advice on that later in this chapter.
Collecting data costs money too
When you are planning how to calculate your unit costs, bear in mind the cost of the actual collection process. Think of this when you are deciding on the appropriate level of detail to collect. For example, if you provide a service 100 times over a month, keeping precise records on each individual service may be very onerous. It may make more sense to collect the total cost over the whole month and divide by the number of services to get an average.
There is a trade-off between the accuracy of the information you collect and the cost of collecting it. How accurate you need to be will depend to some extent on the margins you are making on the service. If the profit margin is tight, the risk of getting the costing wrong increases.
Remember
The cost of collecting information should be proportionate to the value of the information and the risk of not having it – what accountants call the principle of materiality.
In the early days of the NDIS there were more than a few complex spreadsheets developed by academics and government departments that were designed to capture every possible cost of each activity and to incorporate a sophisticated allocation of overheads to each cost.
This can be interesting as a one-off exercise and to provide an initial benchmark. It’s not something that is practical for most organisations to repeat month after month – and your costs will change over time.
We adopt a more practical approach to unit costing, focusing on using the systems you already have at hand, or ones that can be readily obtained. Chapter 2 provides more guidance on how to determine what level of detail makes sense for you.
What makes sense also depends on the size of your organisation. Both the risks and resources are different between a service provider with annual income of $250,000 compared to one with $2.5m. In Chapters 3 and 4 we’ll look at how you can collect and report on the information that makes sense for your organisation – and provide those reports regularly without blowing your administration budget.
Tip
Because the world is changing around you, and your internal costs and processes can change, it’s important to report on unit costs regularly. It’s not something to do once and forget. Monitoring trends in costs will give you the ability to react quickly and early before there is a crisis.
Australia’s changing funding environment
As you may be acutely aware, the funding environment in Australia for NFPs is changing, with funding moving away from block funding and towards individual payment for specific services. These changes mean many organisations need to analyse their internal operations and so gain a much better understanding of the true comprehensive cost of service delivery. Once they have this understanding, they can then work toward a logically and sustainably derived target price, which includes a consideration of the adequacy of funding arrangements and other strategic options for maintaining profitability.
While the funding environment continues to change, moving towards more market-like conditions, some aspects are clear:
- Management accounting is important to service provision: The increasing need to cost and price services means providers are now required to incorporate accepted management accounting principles and key terms into their approach to costing and pricing.
- The costing process involves time and money: The degree of costing specificity and detail should be weighed up against usefulness and overall benefit. The main advantage of costing and pricing in a more competitive environment is that it helps an organisation to understand sustainability and to make decisions about competing on quantity, quality and price — any detail beyond this is unnecessary.
- Costing is an ongoing process: The costing process is unlikely to predict exact costs, so organisations should frequently review their actual cost outcomes so they have time to implement mitigation strategies. This means you need to compare the actual costs incurred, the actual price received and your activity levels against budgeted expectations. Your organisation should also be alert to seasonal changes to ensure revenue continues to exceed costs overall.
- Costing involves an understanding of the expected level of activity: Your organisation needs to consider the expected activity level in any given period to more accurately calculate unit costs. Keep in mind that activities with higher or reduced numbers may still incur similar costs, especially if resources cannot reasonably be redirected due to lack of notice. The costs of your organisation ‘standing ready to provide a service’, even if this service isn’t taken up, need to be recovered.
- Costing requires board oversight: Costing and pricing have governance implications, and your organisation’s board may wish to review assumptions made and/or have additional or different reports forwarded as required. For example, boards often require reports that assist in monitoring activity levels and actual versus expected costs to assess the accuracy of the original costing and pricing expectations and assist in highlighting issues to be mitigated. Since costing involves forecasting, cost mitigation strategies need to be set in place as soon as possible after a material issue has been identified.
- Mission-driven organisations need to generate profit: As the funding environment changes, service providers need to recover all their costs and generate a profit to remain sustainable. Profit is needed to generate working capital, invest in infrastructure and innovation, and to meet the organisation’s strategic and operating plans. Of course, the capacity for each activity to deliver a profit will vary, and the ‘mark-up’ for each activity does not have to be same. However, the combined financial outcomes generated by the achieved price for each activity must meet the organisation’s financial requirements. Due to the nature of government-funded service provision, a gap between your organisation’s target price and its achieved price is common. So your task then becomes calculating both the comprehensive cost and the target price, and developing strategies for narrowing the gap.
- Sustainable operations are essential: Sustainability for service providers is essential not only for the organisation but also for government, and to maintain diversity, choice and continuity of service for participants. Not all lines of service need to operate profitably to be sustainable; however, the long-term financial effects of deciding to offer unfunded or underfunded services must be clearly understood so that strategies for achieving cost recovery in other ways can be put in place.
- Block funding may still be needed in small demand markets: Base prices and loadings are unlikely to reflect the comprehensive cost of service delivery in small demand markets and where cultural priorities and other issues mitigate the ability of a service provider to deliver services. Block funding may be needed to allow providers to recover costs in these circumstances.
The preceding points have been adapted from ‘A National Costing and Pricing Framework for Disability Services: A Resource Developed for National Disability Services’ by Professor David Gilchrist, director of the Curtin Not-for-profit Initiative. See the full document for more information.
How to use unit costing to estimate your costs
There are essentially two options for unit costing:
- Spreadsheets were the traditional method
- The modern approach is to utilise the data in your accounting system more effectively
There will always be a place for spreadsheets in a finance office but the more complex they are, the greater the risk of errors and the more work that is required to maintain them.
There are three clear advantages of using modern reporting tools:
- Reduction in errors
- Elimination of much manual data entry
- Automation of output to ensure regular reviews
Table 1-1 shows some pros and cons of using spreadsheets compared to modern accounting programs to estimate costs.
Table 1-1 Estimating Costs Using Spreadsheets versus Reporting Tools
| Spreadsheets | Accounting Program | |
| Working Method | Traditional | Contemporary |
| Tools Available | Spreadsheet | Calxa Premier |
| Skills Required | Most finance officers are already familiar | Most computer-literate professionals can easily get started |
| Advanced skills necessary to maximise functionalities | Initially unfamiliar — needs some time investment for learning | |
| Effort | Provides an accurate one-off costing — but takes time | Wizards and shortcuts to help get started |
| Hard to maintain each time | Automated update each month | |
| Difficult to hand over to new staff | Requires some training, but simple to handover and delegate to new staff and program managers | |
| Easy to overwrite formulas | Cannot manipulate numbers | |
| Standardises reporting method | ||
| Productivity | Not linked to the accounting system — requires double entry | Automatic update of monthly data |
| Needs review each month to update new accounts and jobs | Automated import of accounting and job structure | |
| Batching of reports keeps delivery standard, easy and quick |
Tip
Calxa works with MYOB AccountRight, Xero and QuickBooks Online to streamline your monthly reporting on unit costs and cashflow. It provides a cost-effective way for you to get regularly updated costings with minimal effort. There is a donation program available for smaller Not-for-Profits.
Figure 1.1 shows an overview of the process for estimating your unit costs with Calxa and your accounting system.
See chapters 2-4 for more detail on the implementation but if you take it step by step, you won’t find it hard!
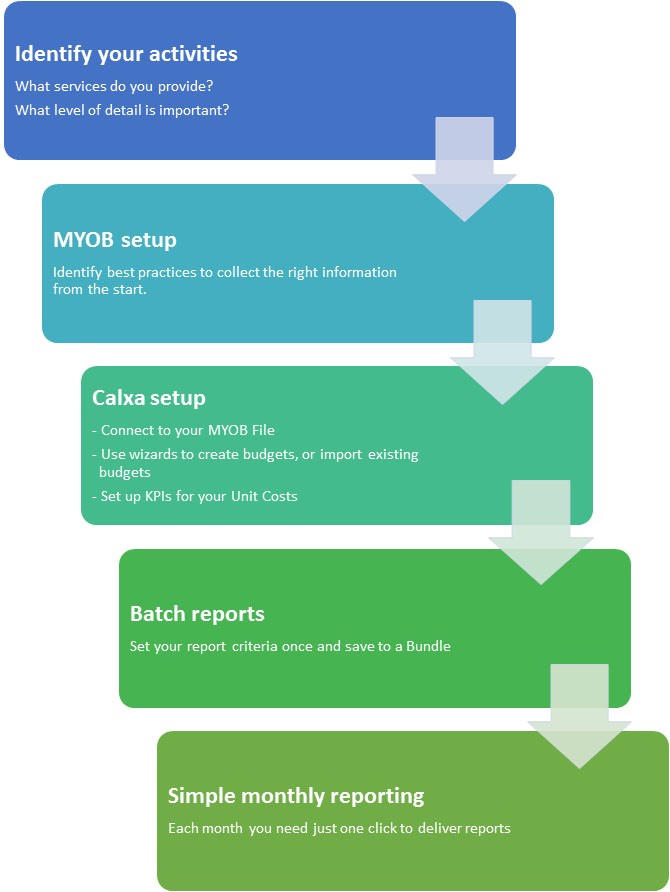
Figure 1.1: Simplify your reporting by connecting Calxa to your accounts.
How to track your activities
As we saw in Figure 1.1, before you can measure your unit costs, you need to know just what a ‘unit’ is. Sometimes this is simple — an hour of someone’s time, for example — but in others it can be more challenging.
Start with what clients are paying for
An activity is something that you provide to your clients that they are willing to pay for. That’s where you earn your revenue, so it makes sense that it’s the place to start with measuring costs – because at the end of the day we want to compare costs to revenue.
Group activities, as we discussed previously, are a little harder to manage than a something with a direct, one-to-one relationship between costs and revenue. One example would be a respite centre that takes groups of children with disabilities for weekly outings. The types of activity will vary and might be something like:
- A trip to the beach
- Lunch at the zoo
- A picnic in the park
- A movie and dinner
With the clients (or their guardians) making the choice of whether to attend or not each week, you can never be sure of exact numbers and the costs will vary with the activity. What you do know is:
- The fixed price each child will pay for the outing
- The direct costs will vary with each outing
- The number of staff will vary depending on the risk and complexity of the outing
Using our maxim of “Start with what the client is paying for”, it’s clear that a unit in this example is one outing for one child. It’s usually not practical though to calculate the precise costs of each child’s outing. How do you allocate carer time, fuel costs, etc? How do you manage the variability from week to week of the different events?
The key here is to step up a level and to treat all the outings as one activity. Monitor the total costs for the outings over a month and divide that by the number of children involved and you’ll have an average unit cost. We know that within that some activities will cost more than the average and some less, but as long as the average cost over the month is less than the average revenue, the activity is profitable.
Remember
Use estimated numbers to budget for events before they happen and then review those estimates after – that way your estimation process will improve with time.
Revenue must be greater than costs
The value of unit-costs lies in informing your decision-making. Should you provide a particular service? If the costs, over time, are greater than the income, you’ll need to either streamline the costs (we’re assuming for now that you have little control over the price you charge) or discontinue the service.
At the very least, if you decide to continue to provide the service (because it’s a core part of your identity as an organisation), you’ll be fully informed about how much you need to cross-subsidise it from other revenue sources.
Remember
Take a long-term perspective in your decision-making. A profit one week can make up for losses the week before so don’t panic when you have one bad result. Sometimes, especially when you first offer a new activity, you have to accept losses while you spread the word and build up the numbers.
What you don’t want is a string of bad results so monitor your costs regularly to ensure that the overall result is good.
Tip
Monitor your costs month by month for your organisation to see that they’re not trending upwards and that there are no spikes in your unit costs.
Chapter 2: Setting Up Your Accounts
In This Chapter
- Setting up your chart of accounts, as simply as possible
- Letting Jobs, Classes or Tracking Categories do the hard work
- Understanding how your accounting file can work in with Calxa
There are two vital parts of your accounting system setup that will influence how hard or easy your unit costing is so it’s worth spending a little time getting these right first. The first is how your Chart of Accounts is structured and the second is the way your business units are set up.
Because Calxa works with multiple accounting systems, we’ll use the generic term “Business Units” to refer to Jobs or Categories in MYOB AccountRight, Tracking Categories in Xero and Classes, Locations and Jobs in QuickBooks Online. There are a couple of nuances between the different systems but mostly, once the data has been linked to Calxa, everything is the same.
In this chapter, we’ll cover best practices on setting up both areas and give some tips to help you on your way.
Your Chart of Accounts
There is an Australian Standard Chart of Accounts for NFPs. In some parts of the sector, using this is becoming mandated (though less frequently than it was a few years ago); in other areas, it’s preferred by funding bodies. If your organisation is within a sector where the Standard Chart of Accounts is required or preferred, simply go ahead and use this option.
If you have complete autonomy to choose your own Chart of Accounts, organise it so that it’s easy to use for your finance officer or bookkeeper – the person doing the data entry.
In days gone by, the Chart of Accounts was structured either for the compliance needs of the accountant or it was arranged to give management the reports they needed straight from the accounting system – as long as they only ever wanted one structure!
With Calxa, you have the flexibility to group, arrange and summarise your accounts in many different ways so, for reporting purposes, it really doesn’t matter what the underlying Chart of Accounts structure is. We’ll explain how to do this in Chapter 4.
Remember
Avoid duplicating sections within your Chart of Accounts to manage your cost centres – that’s what Business Units are for. Ideally, you should have, for example, just one Wages account (plus possibly different types like overtime, allowances, etc). What you should avoid is Wages Department A, Wages Department B, etc.
Try to keep your Chart of Accounts as simple as you can while still collecting the information you need for decision-making.
Choosing your Business Units
As mentioned above, there are some nuances between the different accounting systems in how Business Units are implemented and we’ll outline some of them here. If you’re in any doubt, talk to your local Advisor/Partner for the accounting software.
Xero Tracking Categories
There are 3 important points to know about working with Tracking Categories in Xero:
- You can create 2 types of Tracking Category and have up to 100 items in each. While this isn’t a hard limit (it won’t prevent you creating 101), Xero’s warning is that going beyond this will impact performance.
- The Tracking Categories are a flat list – there is no hierarchy or header structure as there is with MYOB Jobs or QuickBooks Classes. This is not a major issue as you can create groups in Calxa and then choose to report on them consolidated or detailed.
- While you can enter 2 Tracking Categories on a transaction, you can’t report or budget in Calxa on the intersection of these. For example, if your Tracking Categories are lists of Departments and Projects, you can budget for Department A, Department B and for Project #1, Project #2 but you can’t budget for The Project #1 costs that are just in Department A or the Project #1 costs that are just in Department B.
MYOB Jobs and Categories
There are two ways to manage your activities in MYOB AccountRight: Jobs and Categories. In most cases, we recommend using Jobs as they are more flexible and easier to use.
Categories have the following features you should consider before using them:
- They provide the ability to generate a Balance Sheet by Category report in MYOB. If this is important to you, consider categories.
- You can make the use of Categories compulsory in MYOB – so that a transaction can’t be recorded without one. With Jobs, you need to rely on a warning followed by the use of exception reports.
The disadvantages of Categories are:
- They apply to the whole transaction, not individual lines. This makes it complex to allocate an invoice that applies to different activities.
- Transferring costs from one Category to another is complex and involves multiple transactions through a clearing account. Categories work best when there are only rare inter-Category transactions and the Business Units are distinct and autonomous.
Jobs in MYOB are much more flexible and simpler to use.
- Jobs are applied to transaction lines so it’s easy to allocate an invoice to multiple activities.
- Payroll lines can be further split over multiple jobs.
- There is a hierarchy within jobs so you can create Header Jobs at up to 3 levels. While the reporting on these in MYOB is limited, Calxa removes that restriction and gives you options to consolidate reporting at one or more header levels.
Tip
If you’ve been budgeting for Jobs in MYOB and are now moving to Calxa, it’s no longer necessary to create new jobs each year. In fact, you limit your reporting if you do. Keep the same job numbers and you’ll be able to report in Calxa across financial years.
QuickBooks Classes, Jobs and Locations
Classes are the most commonly used Business Unit in QuickBooks Online for activity tracking. Similarly to Jobs in MYOB, they provide:
- A flexible hierarchy of Header and Detail Classes;
- Application to individual lines so that it’s easy to allocate transactions to multiple activities;
Jobs are preferred by some organisations as a Job is directly attached to a customer.
Getting Ready to Integrate Your Accounts and Calxa
Calxa can be used with a number of different accounting packages and integrates with these packages in different ways. However, aside from your initial company setup and subsequent updates, Calxa then behaves in much the same way regardless of the chosen accounting package.
This section outlines the specific aspects you should be aware of before using Calxa with your accounting file, and also provides some tips on best practices for a smooth integration.
Checking supported MYOB versions
Before getting started, you’ll need to check that the version of MYOB used by your organisation is supported by Calxa. While you could use MYOB Essentials with Calxa, it’s not ideal for Unit Costing as it doesn’t have Business Units.
Calxa works well with MYOB AccountRight but note that your data must be online. While MYOB give you the option of storing data locally or on a network, because Calxa is browser-based, it can’t access that data.
Understanding integration basics
Integrating your accounting data with Calxa is simple. During the setup process you’ll be prompted to sign in to your accounting system (using your Xero or QuickBooks login or your my.myob account) and then select your company file. Calxa will then extract your data. You can refresh the data any time by going to Settings, Organisation Settings, Organisation Sync and clicking the Sync Now button.
Tip
Create a workflow to schedule accounting updates into Calxa. Do this from the Settings and Workflows area. Schedule the update monthly, weekly or daily, depending on how frequently you run your reports. We recommend an overnight sync for maximum flexibility.
Calxa doesn’t create a live connection and no changes flow back through to your MYOB, Xero or QuickBooks.
Looking through accounts and opening balances
Calxa references each account using a key rather than the account number or name. This means you can safely renumber or rename accounts in MYOB, QuickBooks or Xero and Calxa will still recognise them. Deleting or merging an account in the accounting system also deletes or merges this account in Calxa, along with any associated budgets, actuals or settings – so take care!
Remember
During the initial import, Calxa sets up account opening balances from the opening balances in your accounting system. Future organisation updates will not affect these balances, so changes made to opening balances will not be reflected in Calxa. For this reason, you should only adjust opening balances with a General Journal.
Merging balance sheet accounts is also not a good idea because the opening balances will not be updated on the merged account.
Transferring business units
‘Business units’ is the broader term used in Calxa to represent both Categories and Jobs from MYOB, Tracking Categories from Xero and Classes, Jobs and Locations from QuickBooks. Although the Calxa terminology is configurable, the defaults are:
| Accounting System | Business Unit | Calxa Term |
| Xero | Tracking Category | Project
Department |
| QuickBooks | Class | Class |
| Customer | Project | |
| Location | Department | |
| MYOB | Job | Project |
| Category | Department |
As with accounts (refer to preceding section), Calxa references each Business Unit on a key rather than the number or name. This means you can safely renumber or rename them in the accounting system and Calxa will still recognise them as the same. Deleting a Business Unit in the accounting system also deletes it in Calxa, along with any associated budgets – so take care!
Choosing to import budgets
On the initial import, Calxa will give you the option to import budgets and these come into a separate read-only budget – which you can copy to edit. You can turn budget imports on or off in Settings, Organisation Settings, General.
Depending on your accounting system, there are some limitations on what budgets are imported.
MYOB AccountRight
During the budget import, Calxa will import and update the Organisation budget for the Current Year and Next Year. Since monthly business unit budgets cannot be saved in MYOB, Calxa will assume Job budgets are an annual value for the current financial year and the budget value will be split equally across the 12 months.
QuickBooks
Calxa will import one selected budget version, including all classes, locations or customers, for the financial year related to that budget.
Xero
From Xero, Calxa will import the Overall Xero Budget at the company level for the current year, the next 2 years and all historical years. We can’t import Tracking Category budgets or alternate budget versions. You could export these to a spreadsheet and import them to Calxa from there.
Remember
Synchronising budgets is a one-way operation, so changes made in Calxa will not flow back to your accounting system.
Chapter 3: Setting Up Calxa
In This Chapter
- Getting started with Calxa
- Adding a new organisation to access your MYOB data
- Creating and importing budgets
Calxa provides some great options for using the data in your organisation’s accounting file, managing your cashflow and working with budgets.
This chapter takes you through some of the setup basics. It then gets to the good stuff, taking you through the budgeting options and showing you how you can create a budget in Calxa or import an existing budget from another source.
Creating Your First Workspace
Most people start Calxa from a free trial – it gives you the opportunity to fully evaluate it against your needs before committing. The steps are very similar if you add a new organisation to an existing subscription.
Set your login details
Because we care about your security and that of your data, we need you to create a strong password initially.
Connect to your accounts
Choose your accounting system (MYOB, Xero or QuickBooks) or select the Create Your Own option if you use another system.

You’ll be prompted to sign-in to your accounts and then select your company file.
Import Settings
You can choose to import budgets (see notes in Chapter 2), and which business units you plan to use. You can change these options for subsequent imports in Settings, Organisation Settings, General.
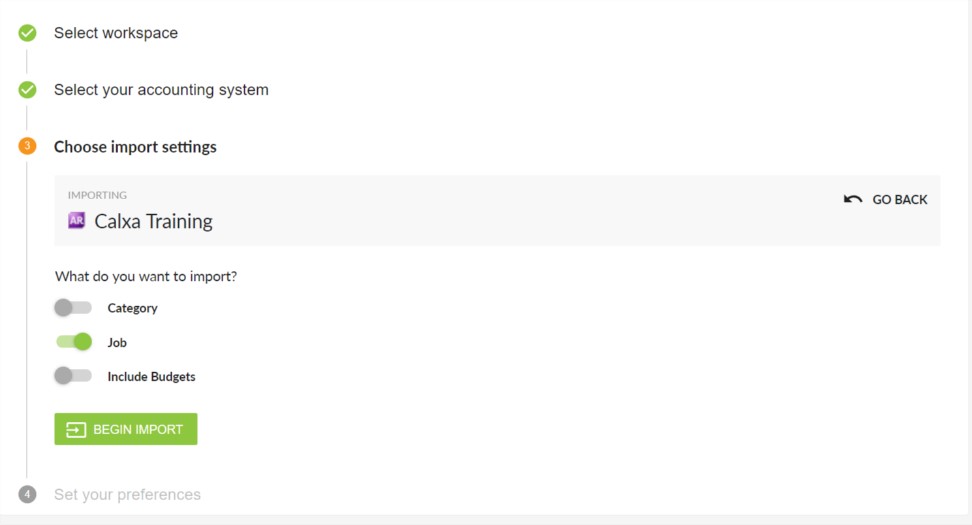
Then click on Begin Import.
Financial Settings
We now ask you some questions that will help us to get your basic setup right – you can update these later in Budgets & Cashflow, Cashflow Settings.
Select your industry grouping. This will help us tailor settings and advice to suit you better.
Select the appropriate schedules for when you pay GST/VAT, PAYG/PAYE and Superannuation. These are important for an accurate cashflow forecast.
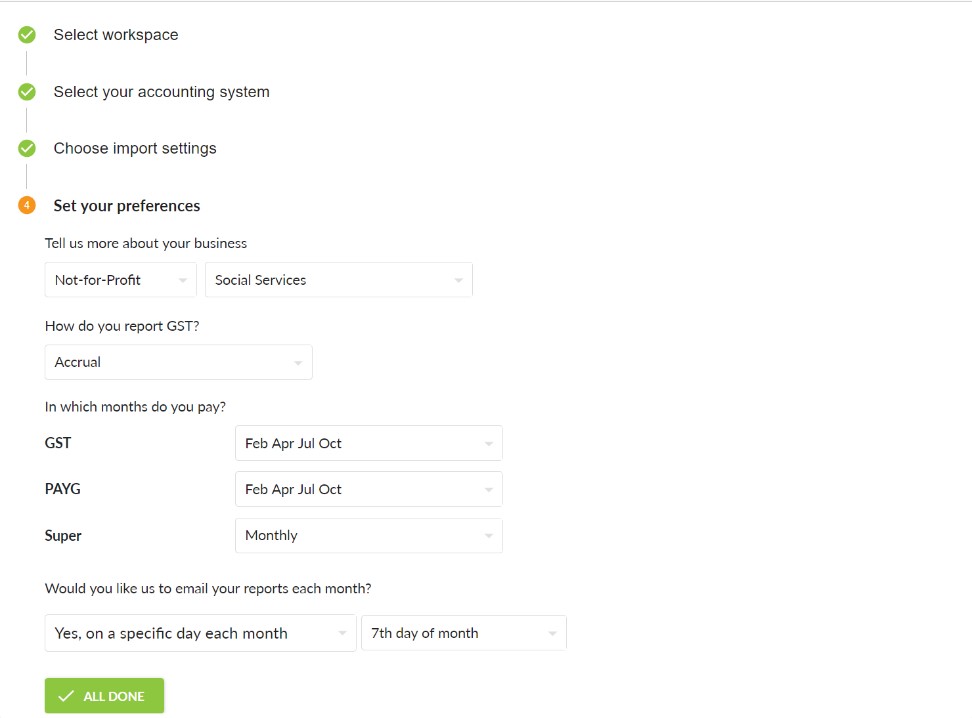
Would you like us to email your reports?
If you’re new to Calxa, select this option and we’ll create a standard bundle of reports and email it to you, now and on your chosen date every month. It will give you a good introduction to the reporting capabilities and you can always modify the Report Bundle later to exactly what you need – or replace it completely.
That’s it! You’re now ready to explore your new Calxa organisation.
Tip
If you have another organisation to add, go to Settings, Billing & Admin, Subscription.
Taking Advantage of Budgets
You can create budgets in Calxa in a number of ways — and then the fun really begins, as you use your budgets to track revenue against costs and make budgeting and planning adjustments.
This section takes you through creating a budget using the Budget Factory in Calxa, and then shows you how to import budgets from an external source.
Creating a new budget using Budget Factory
The Calxa Budget Factory allows you to quickly and easily create budgets for multiple business units. Just follow these simple steps:
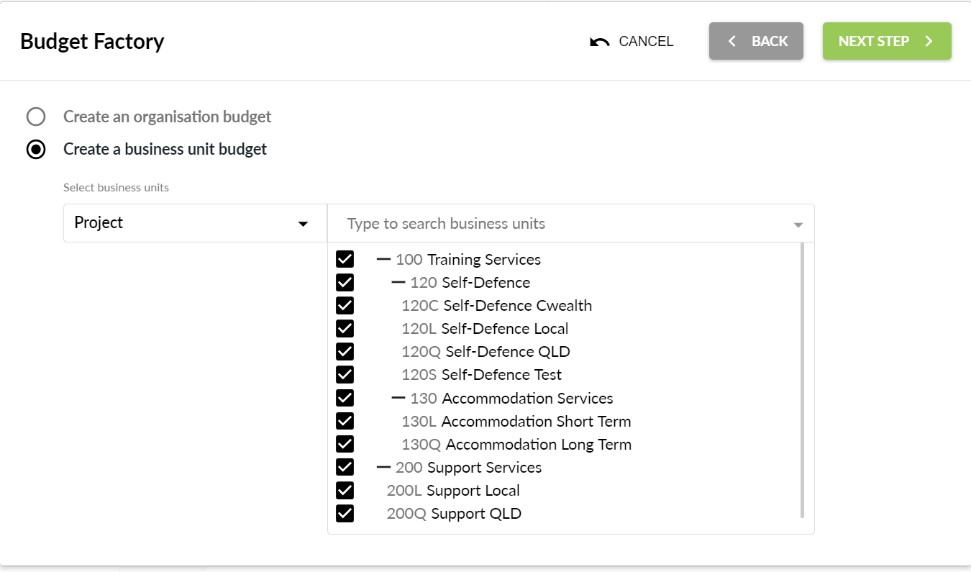
- Go to Budgets & Actuals, Budget Tools and select the Budget Factory
- Start with the Profit & Loss budgets.
While you can use the Budget Factory to create Balance Sheet budgets, they are less likely to follow a simple pattern from the previous year.
- Select the business units that you want to apply the budgets to and click Next Step.
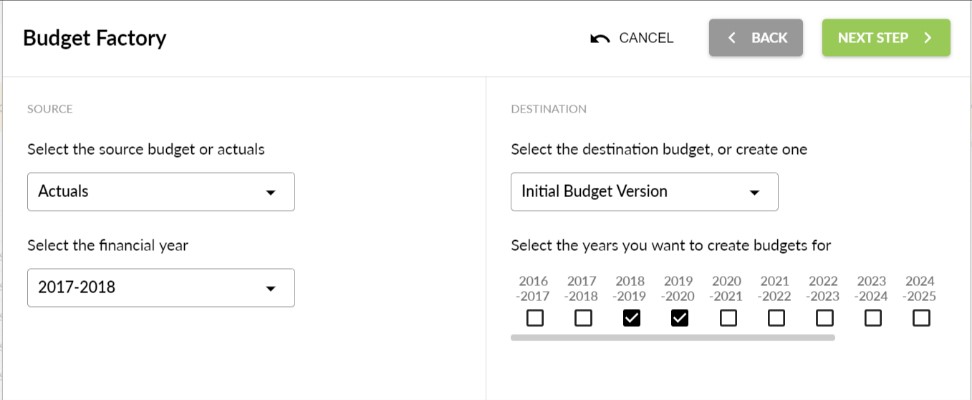
- On the left, select the source of your new budgets
Most often you’ll use Actuals and the previous financial year.
Tip
As well as creating new budgets, you can use the Budget Factory to do bulk updates to existing budgets – just use the same source and destination. Be careful with this option though as there is no easy way to undo your changes.
- Choose a budget to update.
Usually you’ll use the Initial Budget Version when creating your first budget but you can create a new budget here.
Select the years to create – we recommend you have budgets for both the current and next financial years.
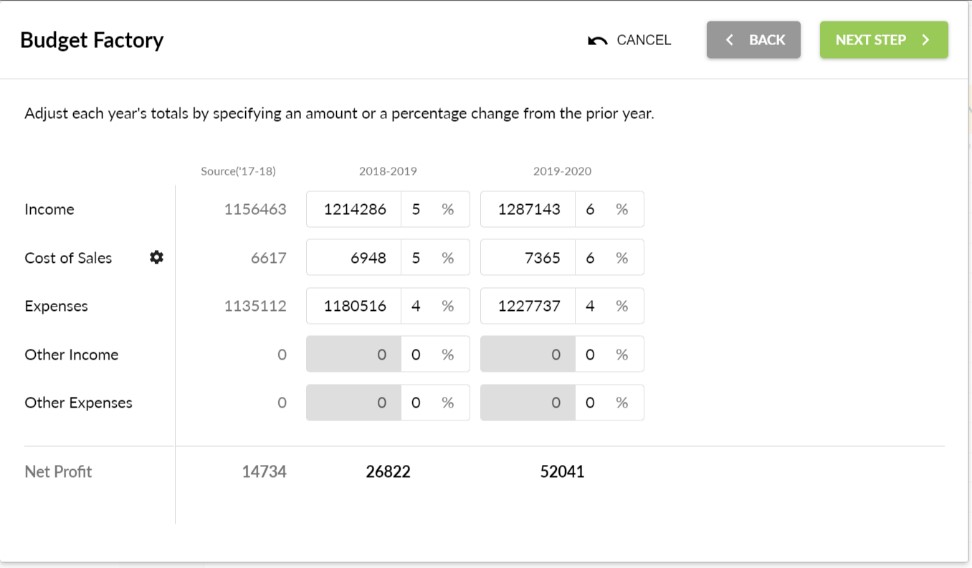
- Adjust your budget amounts.
Add percentage increases or decreases for each account type (or just type in a new total) for each year.
Tip
Use the cog next to Cost of Sales to change the calculation type from a percentage increase on the previous year to a percentage of income. Set the appropriate Cost of Sales percentages and you’ll now be able to edit the Net Profit directly – and the Income will adjust to what you need to earn to get to that profit.
- Review your changes before committing.
The final step will show what you’re about to change and warn you if you’re going to over-write existing data. Take great care if you are, as there is no easy way to reverse this process.
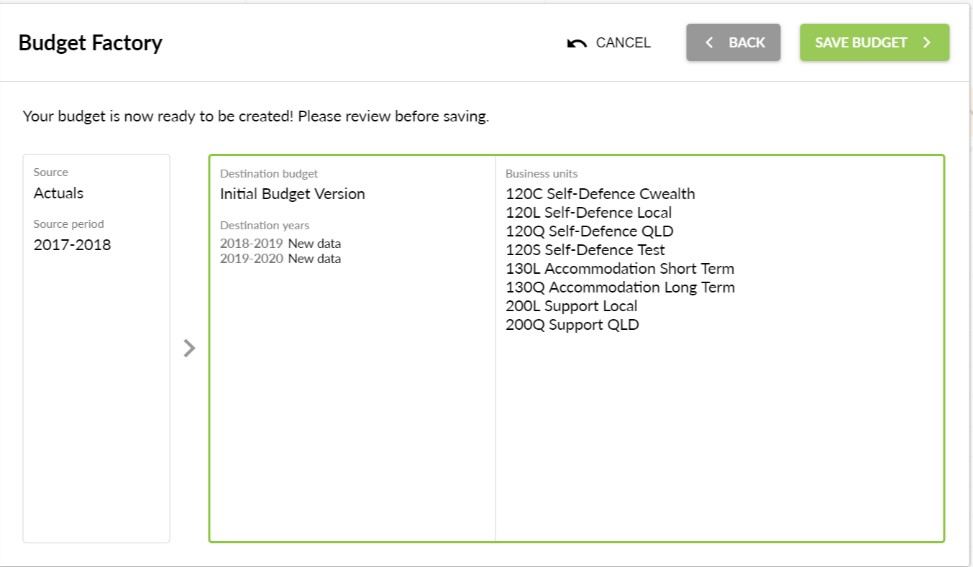
Once your budgets are created, you can:
- Review your Budget Reports
- Edit and fine-tune your budgets
Tip
If you’ve created budgets at the Cost Centre level, select your organisation budget and set the Consolidation Setting to automatically combine them – then you don’t need to separately manage the organisation-level budget.

Importing a budget
Calxa can import budgets from Excel, or as CSV text files. You can also export budgets from Calxa to Excel if you need to manipulate your figures with complex calculations.
Tip
If you plan to import your budget from a CSV text or Excel file, first export a sample budget from Calxa to get the required format for importing. If you don’t yet have any budgets created in Calxa, you can export a blank template in the correct format by turning on Export empty rows.
You’ll find the Export and Import options in Budget Tools.
Choose the organisation or the business units you want to export and normally it makes sense to do the Profit and Loss accounts first. The date range defaults to your current financial year but you can adjust it here.
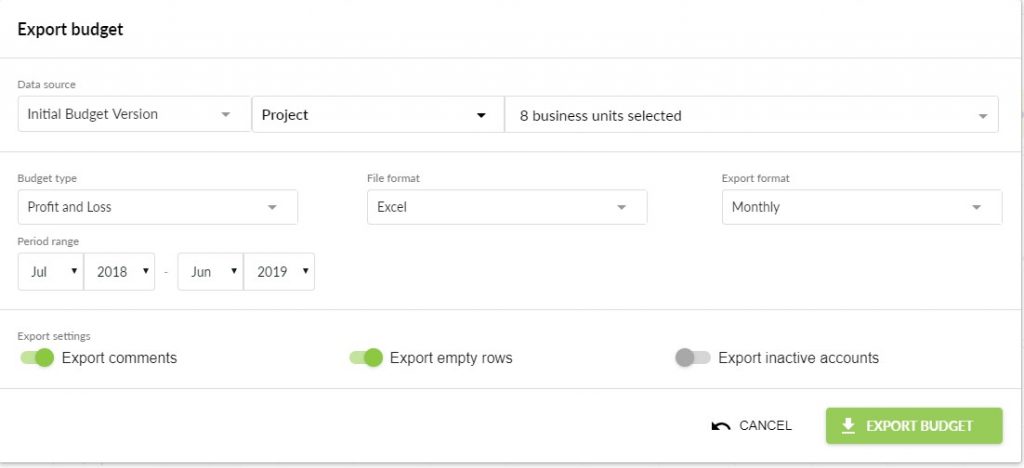
Once you have exported a template, you can then modify the numbers, copy and paste existing budgets, or create calculations to create your new budget.
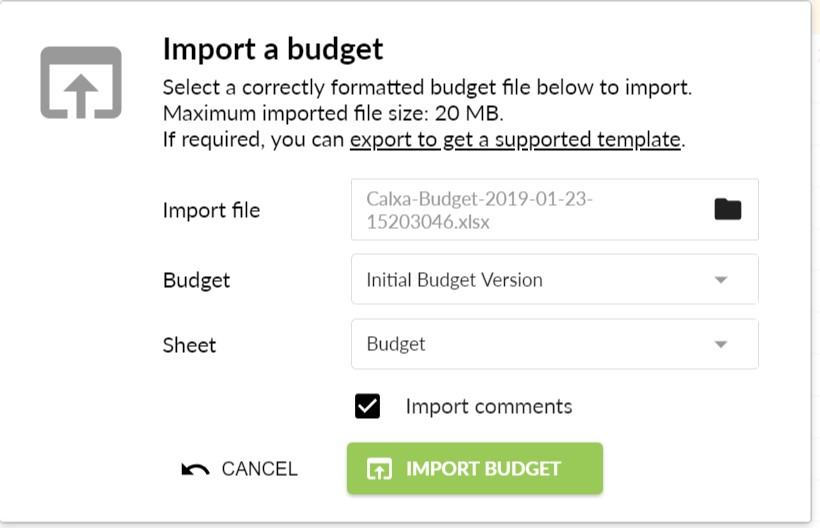
Here’s how to import a budget to Calxa:
- In Budget Tools select Import Budget.
See Figure 3-11. The Import Budget Parameters window will appear.
- Browse and select the file containing your budget.
- Choose the Budget to import into.
If you have multiple sheets in your spreadsheet, choose the one with your import data.
Import comments if you have inserted those in your spreadsheet cells.
- Click Import Budget and then click Close.

You’re done!
As with when you’ve created a new budget, you can also review, edit and fine-tune imported budgets.
Tip
The budget import process is very flexible and supports partial imports. Don’t delete any of the first 6 columns that identify the business units and accounts but you can remove any rows you don’t want to update – or any months. Do your complex calculations in Excel and then import just the rows you want to change. And if you’re updating for a mid-year review, remove the completed months.
Tip
If there are any errors in your import, they will be listed including the row numbers. No rows at all are imported if there are errors so it’s safe to re-import the entire spreadsheet.
Chapter 4: Working with Unit Costing KPIs and Reports
In This Chapter
- Tailoring your KPIs in Calxa for unit costing
- Taking advantage of Calxa’s unit costing KPI reporting and charting
- Working out the best Calxa reports for your organisation
Carrying your organisation’s data across from your accounts into Calxa sets up your business units in Calxa and allows you to set budgets for these units. (Refer to Chapter 3 if you need a refresher on setting up these basic areas in Calxa.) Once you’ve set up your business units and budgets, you can get down to the nitty-gritty of identifying unit costs and setting unit cost KPIs.
This chapter provides all the insight you need and gives you some tips on making the best use of the many reports Calxa offers.
Setting Up Unit Cost KPIs
To calculate the unit cost of an activity, you need to know the total cost of that activity and the number of people who participated. When you’re using Calxa, you can track down the total cost easily — just check the total expenses allocated to the Business Unit (Job, Class or Tracking Category).
To record the number of people who participated in the activity, you can use the Metrics function in Calxa.
Using Metrics to record non-financial data
You can use the Metrics function in Calxa to record non-financial data such as the number of participants in specific activities (or the number of units of something that you have sold). Metrics are set up in the Budgets & Actuals area of Calxa. You can add new Metrics and record Actuals and Budgets against them, by month and by activity or job.
Here’s how:
- Go to Budgets & Cashflow, Budgets & Actuals.
- From the Layout option at the top, select Metrics by Month.
- Choose your Business Unit from the list on the left.
- Select the appropriate budget version (or Actuals) at the top left.

See Figure 4-1.
- Click Add Your First Metric – or just Add Metric if you already have some.
4.2 Adding a new Metric
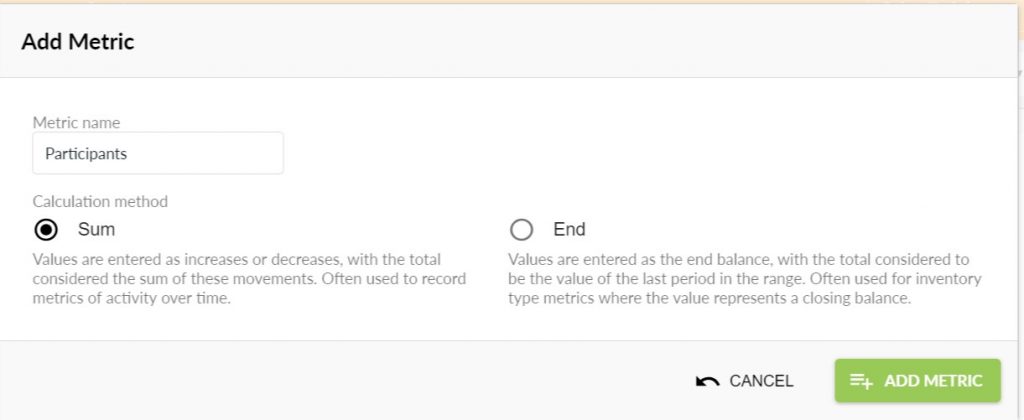
See Figure 4-2. When adding a Metric, set the Calculation Method. Most of the time Sum is the best choice. A total will add all the values in a date range. If you choose End, a total will use the latest value in the date range and ignore the others.
- Add monthly budgets for the number of participants for the activities. See Figure 4-3.

Repeat these steps for each activity or business unit.
Tip
While the default period for budgeting is a financial year, you can set budgets on any date range. This makes Calxa very flexible for budgeting for NDIS participant plans, for example.
Tip
Once you have actual numbers of participants for an activity, select Actuals from the Budget list and add in these numbers for the month. (And repeat this for each business unit.)

Editing KPIs for unit costing
When you’ve set up your Metric budgets and actual with Calxa (refer to preceding section), you can create custom KPIs based on groups of accounts or Metrics. Here’s how:
- Go to Reports, KPIs.
- Add a new Account Group
Often, you’ll be working with the total costs associated with your business unit and can use the built-in Total Expenses group. Sometimes, though, you want a subset of that group. It’s simple to create a new group for your needs.
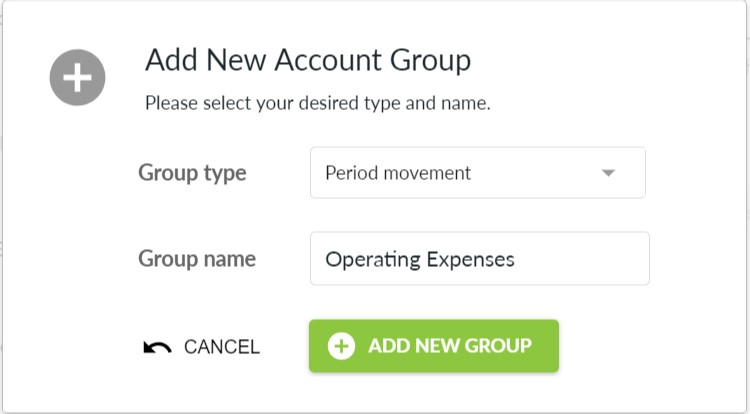
Most often you’ll set the Group Type to Period Movement – that makes sense for most Profit & Loss type accounts where you want to sum the movement over a date range. Use Closing Balance for Balance Sheet accounts where you want the ending amount.
- Select the accounts to include.
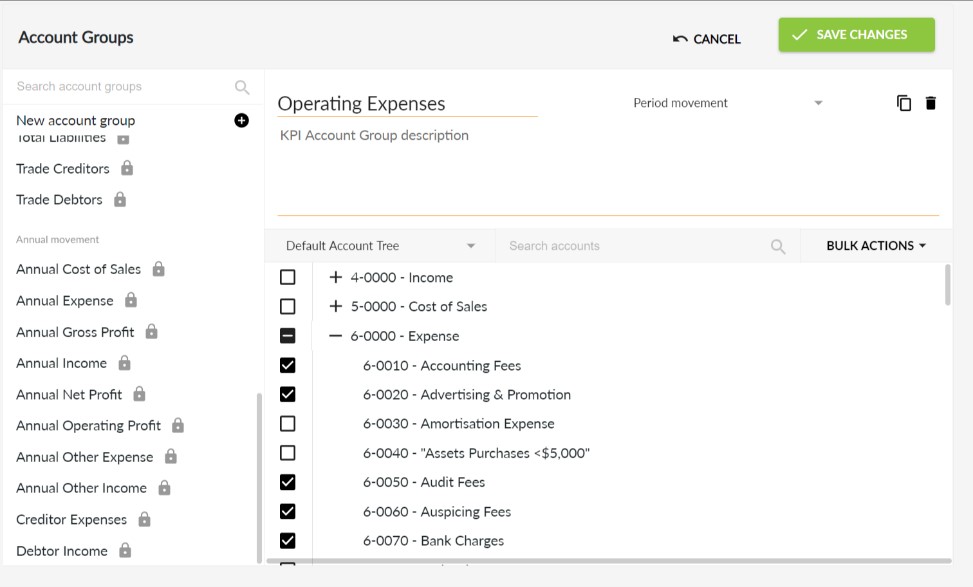
Note that you can view your accounts using a custom Account Tree if you have created one (see below for more information on Account Trees).
Tip
Use the Bulk Actions menu at the top right to speedily select or de-select groups of accounts.
- Add a new formula using the KPI Builder and call it Cost per Participant.
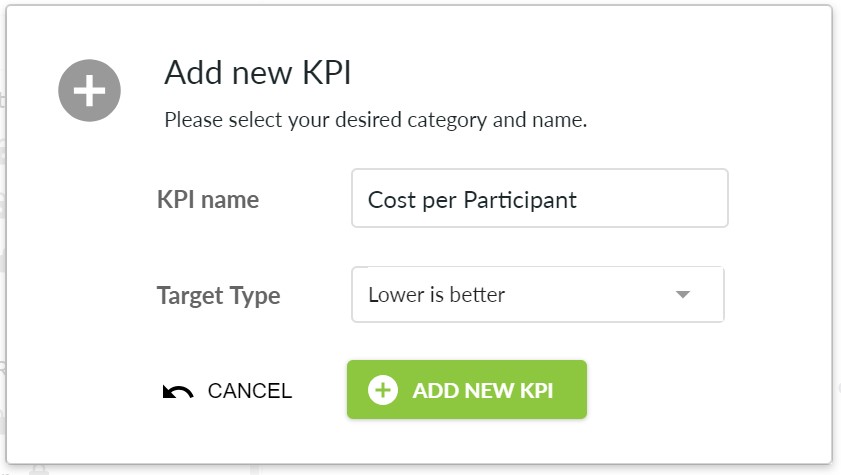
Figure 4-5: Create a new Cost per Participant formula for your unit costing KPI.
- Insert IF([Participants]<>0, [Total Expense]/[Participants], null) into the Formula box.
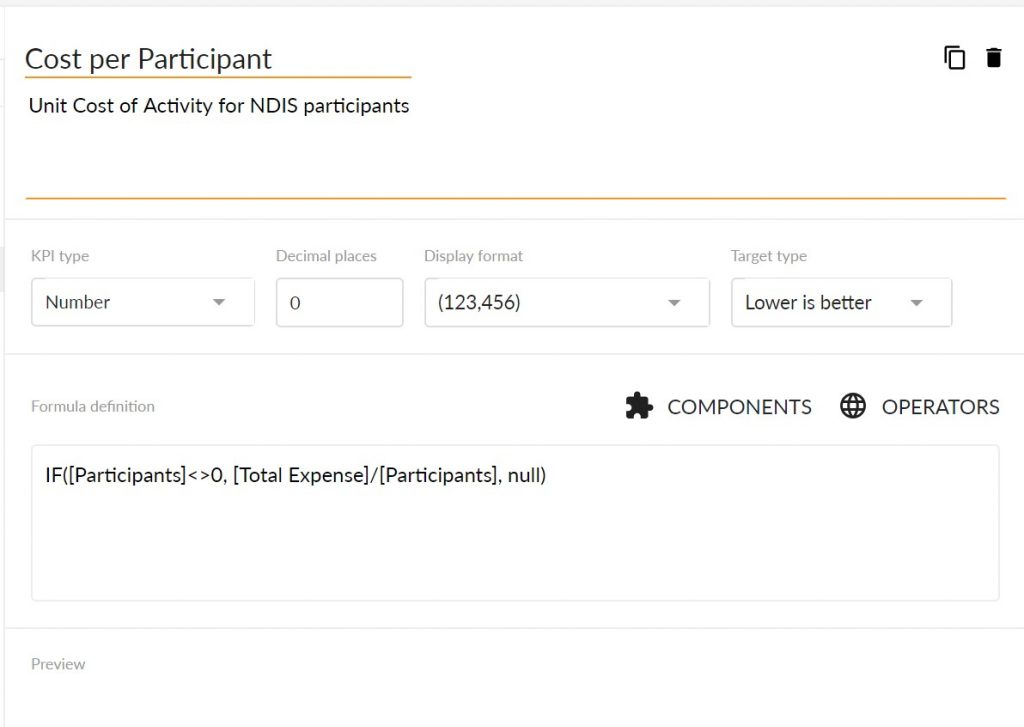
Tip
You can point and click on the Components and Operators to create your KPI without typing.
- Save your KPI changes.
Calxa will calculate your costs per participant and show your overall results in the preview.
Creating Reports and Charts for KPIs
Now you can run a KPI report or chart to see the unit costs for each of your business units, comparing actuals to budgets and monitoring trends over time.
Tip
Here’s how to run a unit costing KPI report:
- Click on Reports and then Builder on the main Calxa menu and select a report that supports KPI reporting.
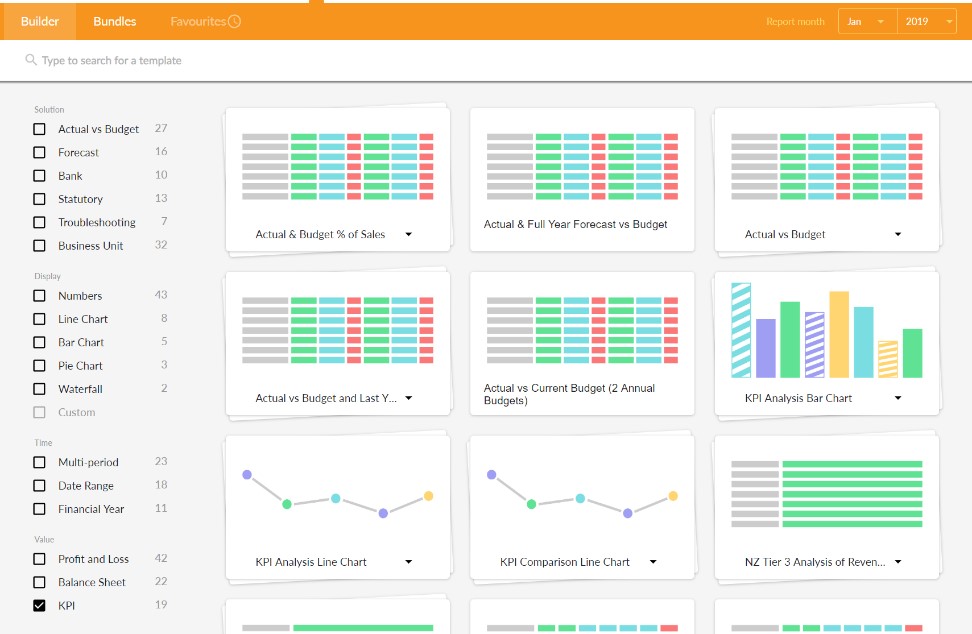
You can further filter your selection by choosing Numbers or a chart type or a Time period. Select a report or chart that suits your needs.
- if you have chosen a report with numbers:
In the filters, you have the option to report on accounts, KPIs or both. When you select Show KPIs, you can choose one or more KPIs from your available list.
- Select the required template from the Report Templates list.
- You’ll now have a preview of your report or chart, ready for filtering.
Remember
The KPI Analysis Line Chart available in Calxa represents 12 months of KPI data. You can choose to include actuals and budgets, as well as last year’s actuals and budgets.
To create a chart for your unit costing KPI, simply follow these steps:
- Click on Reports and then Builder.
- Select the KPI and Line Chart from the list.
- Chose the KPI Analysis Line Chart
The drop-down gives the option of adding a data grid to the display.
- Filter the chart to suit your needs.
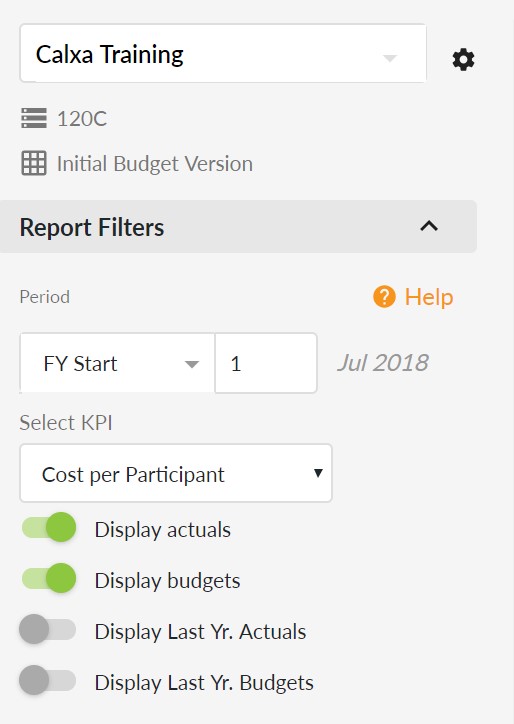
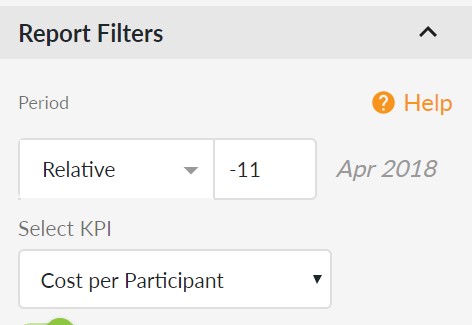
Often it makes sense to start the report from the beginning of the Financial Year, showing actuals and budgets for the year but sometimes it’s useful to have a rolling 12 month report.
To achieve this, change the Period to Relative to Report Month -11
- Now add your report to a Report Bundle
Checking Your Reports
Calxa offers a wide range of reports to really help you track your cashflow and budgets figures against actuals. Here’s a list of the best reports to get started with:
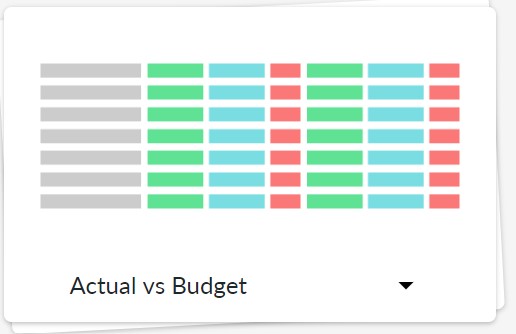
- Actuals vs Budget: There are a few variations on this template, with different column layouts. They are good for monitoring performance against budget for the current month, year to date or against last year.
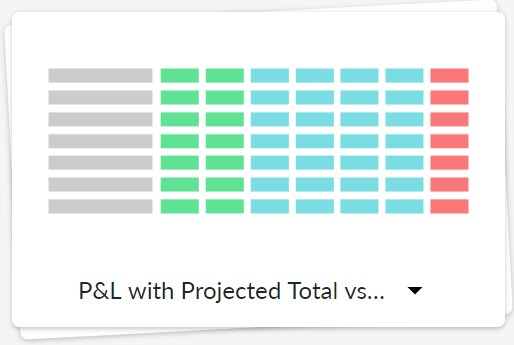
- P & L Projection: Use these reports for monitoring trends over time and see how you’re tracking month by month. The Projected Total shows your most likely result by the end of the year
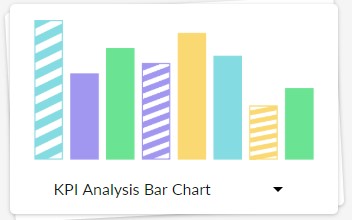
- KPI Charts: Use the line or bar charts to graphically show trends in your unit costs and easily spot problems.
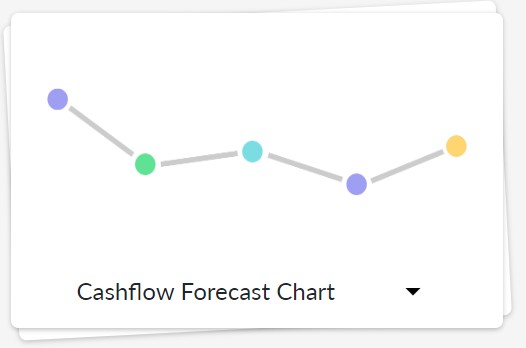
- Cashflow Forecast: Use either the chart or the report to show your predicted bank balance month by month. By using different Budget Versions, you can see the effect of future plans on your cashflow.
See the Reports help note section for more information on how to run specific reports.
Tip
Report Bundles in Calxa give you the ability to produce a group of reports with one click — you can bundle your monthly reports together and print them all at once. See the help note Create a Bundle for more information.
Summarising your Reports with Account Trees
Sometimes your chart of accounts in the accounting system isn’t optimised for management reporting. Account Trees give you the power to rearrange your accounts, grouping and summarising them to suit your needs.
Go to Reports, Report Tools, Account Trees to create your new structure. The best way to start is to copy the Default account tree. Then add a new Header, give it a number and name, and then drag detail accounts onto your header. You can drag a Header onto another Header to create a hierarchy for reporting in different levels of detail.
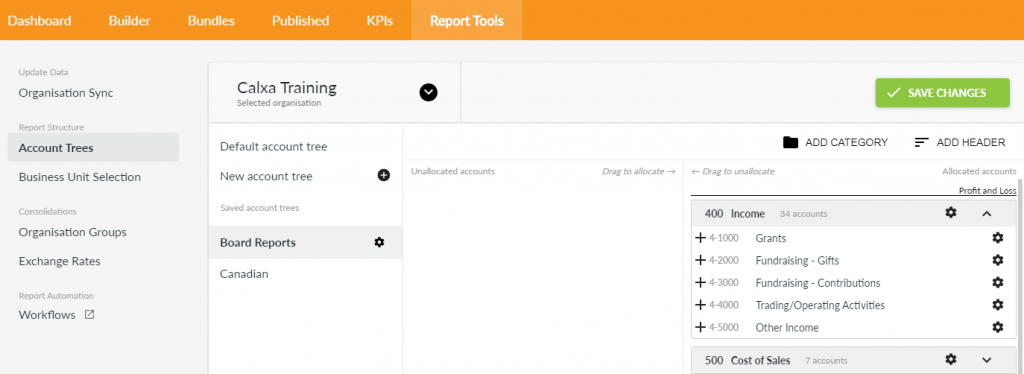
When filtering your reports, choose the Account Tree from the cog next to the organisation name. Then set the Level to choose to summarise your data (low numbers) or show the headings and detail (higher numbers).
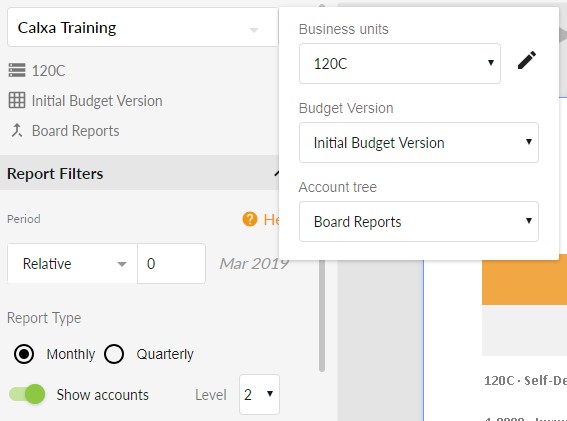
For full details, see the Account Trees help note.
Chapter 5: Six Benefits of Integrating with Calxa
In This Chapter
- Making use of summarised reports and cashflow projections
- Getting the most out of your work (without spreadsheets)
- Having a better understanding of how your programs are progressing
Calxa is a great tool for all not-for-profit organisations – and businesses too! It allows you to become more efficient and fast-track processes such as your grant acquittals and board reporting — allowing you to focus on the more important areas of your organisation. With Calxa, you can create accurate, professional-looking and easy-to-read reports, eliminating complicated spreadsheets and helping make your organisation more transparent.
This chapter takes you through the top six benefits of integrating your organisation’s accounting data with Calxa.
Understanding the Big Picture at a Glance
Sometimes, pictures can tell the story better than numbers and can engage the non-financial members of your organisation and board. And especially for board members, getting an accurate snapshot is important.
Remember
Calxa’s summarised reports can give you an instant idea of variances, discrepancies or where your unspent funding is at, and give you enough information to make solid decisions and take action. This helps you to eliminate the complications spreadsheets cause and make your organisation more transparent.
Projecting Your Cashflow More Accurately
Trading while solvent is a great responsibility and is something your organisation needs to keep a constant watch over. Calxa’s clear monthly cashflow reports and charts can help guide you.
The Cashflow Forecast Chart, for example, shows you at a glance what’s going in and out of your bank, in a format that any non-accountant can understand.
If you need more detail than what’s provided by the chart, you can use the Cashflow Forecast Report to clearly understand where and how your cash is forecasted to move throughout your organisation.
Reforecasting with Ease
You need to keep your organisation’s team ‘on the same page’ and moving towards your overall goals together. Staying focused and in control with forward planning is easier with accurate forecasts — easily provided by Calxa.
Of course, participation and funding can change within your organisation, so Calxa also allows you to easily reforecast for upcoming changes.
Working More Efficiently
Calxa provides the tools you need to help facilitate productivity and efficiency. Typing actuals into spreadsheets, updating new accounts, adding the latest jobs, classes or categories all adds up to days of work each month. Because Calxa links directly to your MYOB, QuickBooks or Xero data, all these tasks are automated — meaning acquitting programs takes just a fraction of the time.
Tip
Refer to Chapter 2 for more on setting up your accounting data and preparing to integrate it with Calxa.
Killing the Spreadsheet!
Spreadsheets are not only hard work but can also be unreliable. Formula overrides and missing rows can quickly unbalance your organisation’s figures and mean you’re delivering inaccurate reports. (And create a lot of extra work.)
Calxa allows you to simply click on its extensive report library to get updated reports. Refer to Chapter 4 for some tips on the best reports to start with.
Controlling Your Programs More Effectively
Calxa provides access to budgets across your business units and regular reports on KPIs such as unit costing (refer to Chapter 4 for more on setting up a custom unit costing KPI).
These tools help keep you in the loop on how your programs and business units are looking — meaning you’re much better prepared to managing the delivery of these programs.
Tip
Keeping an eye on program budgets is paramount not only in ensuring service and program delivery is successful, but also in accounting for funding to the grant providers. Calxa allows you to manage the unspent portion of the grant simply by running templated reports each month. As things change, you can just re-forecast the unspent portion across the remainder of the funding period.
