
Budgeting is seen as a chore by many people There’s the sometimes-endless negotiations over what goes in the budget and then there’s the often tedious task of recording the budget. And then it needs updating. To make work easier and more efficient, we have created Budget Editing Tips.
Calxa Budget Editing Tips
Not every tip will be useful to everyone, all the time, but we are sure you’ll find one or two that will make your budgeting easier.
Starting Off the Budgets
If you want a quick draft of a budget in Calxa, the Budget Factory is the best place to get started. You can run it for all of your cost centres or departments, or just at the organisation level.
Choose the source of your data:
- Use last year’s actuals as a base.
- Copy from another budget version.
Then you can add uplift factors for Income, Cost of Sales and Expenses to create the new budget. As an alternative, switch the option on Cost of Sales to set that as a percentage of sales and you’ll find the Net Profit is now editable. Lastly, set your target profit and it will show the revenue you need to earn for the year.
Creating a Forecast with the Budget Factory
Many people use the Budget Factory to copy their initial or approved budget into the forecast budget version and then amend it from there. That’s the simple way to do it and keeps the original budget for comparison at year end. But what if you want your forecast to be Actuals to date and the original budget for the rest of the year?
That’s actually very simple. Use the Budget Factory and set the source as Actuals for the current year. As you don’t have a full year’s actuals, it will use actuals to the Last Actuals Period (in Settings, Organisation Settings, General. It defaults to the previous calendar month) and then the main budget for the rest of the year. You can set the main budget in Budget Tools, Budget Manager. Use the ellipsis menu to the right of your budget to set it to the main budget and it will be pinned to the top. Now set the destination as your forecast budget and the Budget Factory will do all the work for you.
Changing Totals by Row or Column
Anywhere in the budget editor you are showing a total, you can edit that and the results will be distributed proportionately over the individual cells below. If they are empty, your new amount will be spread evenly; if there are existing numbers, they’ll be adjusted to keep the seasonality.
Many of you will be used to editing the total column when you have a full year displayed. Did you know that this works when you have more or less than a year showing? If you want to spread an amount over 6 months, just display those 6 months and edit the total column. Just be careful not to overwrite any formulas when you do this. You will be prompted with a warning if there are formulas but we have seen people ignore this!
Changing Layouts
Use the Layout option to switch between Monthly, Quarterly and Annual Budgets or Metrics. When you edit quarters or years, the results are applied to the underlying months using the same logic: spread if there’s nothing there, adjust proportionately if there is data.
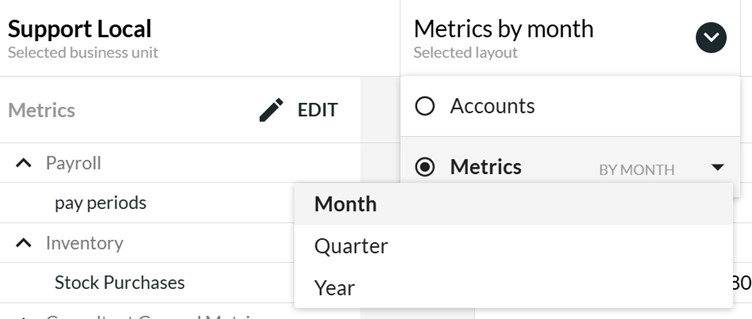
Switch the layout to Business Units and the 2 left columns will be switched. Expand the left menu and choose Accounts to view them by Business Unit. Choose an account first and then the business unit budgets for that one account. Use this when you want to reallocate income or expenses between your projects or when you want to confirm that each project has been budgeted. And remember that you can still switch to quarters or annual budgets in this view.

Use the same logic to select a single Metric and see that by Business Unit.
Managing Rows while Editing Budgets
If you’re following along at home select a business unit in the left menu. Then try the Search button at the top right. You’ll be able to search by account number or name or use the filter to show just some accounts. These settings are remembered between sessions so you’ll come back to where you left off next time.
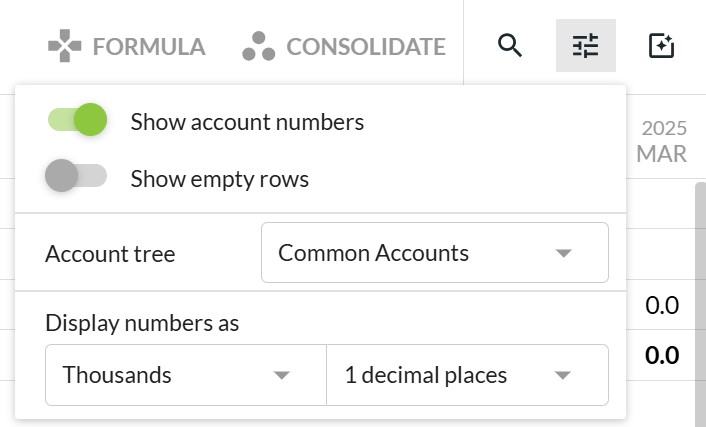
Use the Options button at the top right to show or hide account numbers or empty rows, select and account tree and change the number display formats.
Now you can contract any of the account headers (including the top level like Income or Expense). Then edit at this level. Have you ever had the situation where you have 10 detail accounts for different Motor Vehicles? At budget time, you probably care mostly about the total Motor Vehicle Expense. Just contract the header and edit the total. Simple!
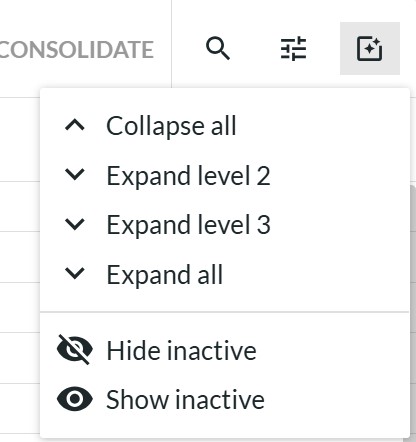
The Bulk Options button at the far right helps you expand and contract your rows and also gives you the ability to show or hide inactive accounts. This is a great trouble-shooting tool if you have deactivated an account in your accounting system that still has budget values on it. We will include those in the totals until you move them elsewhere so just display the inactive account, move the budget and hide them again.
Optimising Visibility while Editing Budgets
To maximise your time, it is important to work efficiently in your budgets. The Calxa Budget Builder is packed with ways of adding your budgets. You can do month-by-month or add single annual amounts. Alternatively, preparing your budgets by business unit may be more productive for you.
Budgets in Multiple Windows
This may seem the simplest of all budget editing tips. To work more efficiently, for example, you can open multiple budgets and viewing them either side-by-side in the software or on your other screen (if you have two). The simplest way to do this is to right-click on Budgets & Cashflow and select Open link in a new window. You could show Actuals in one window and your budget in the one you’re editing.
Maximise the Budget Builder
Sometimes you want to use all the available space for your budgets. You don’t need to see menus or anything you’re not currently focussed on. That’s where the Maximise button comes in. You will find it at the top of the strip of buttons to the right of your budget. It will expand the budget to full screen, removing the parts you don’t need.
If you are editing an existing budget, under Options you will find Show empty rows. Turn that off and you’ll clear the accounts you are not using. You can now focus on making changes to existing budgets with less clutter. Turn it on again if you need to budget for a new account.
Keyboard Shortcuts for Quick Actions
Are you a Keyboard Warrior? Sometimes when you’re working with numbers, it’s easiest if you don’t need to take your fingers off the keyboard so we’ve added a couple of shortcuts to help:
- E – toggles show and hide empty rows
- F – toggles full screen on or off
- I – toggles show and hide inactive accounts
Budgeting for Loans
Most of us need to borrow money from time to time and the Loan Wizard will help you with that. We recommend using a separate liability account and interest expense account for each loan. You don’t have to, but it makes it much easier to reconcile and to make changes later.
Then it’s a matter of entering the loan amount, number of months and start date. You have a choice of entering the interest rate or the monthly repayment amount. We have noticed that some financiers are not very transparent in providing interest rates… If you have a balloon or residual payment, enter that as well.
When you refresh the preview, we will show you the monthly breakdown of your loan as well as the monthly and annual interest rate and total loan cost. Print this if you want to keep a record or for approval purposes.
It’s only when you click on the Save Budget button that we actually make changes to the budget. So you can safely use this wizard to compare different loan options before you commit.
Budget Editing Tips with Formulas
Let’s start with some quick budget editing tips using formulas:
- Click on the account name to select the whole row. It’s easier than trying to select multiple cells.
- Select multiple rows to apply the same formula to more than one account.
- Use Selected Accounts in the formula to base the formula on the same account.
- You only need to complete one side of the formula calculation. The second is optional.
- Set your formulas to Live if you want them to automatically recalculate.
- Use the date options: -1 will be the previous month, -12 one year previous.
- Your formula can be based on Actuals. Set the source to Actuals and Period to -12 to have a continuously updating rolling budget. If you want to get fancy, calculate an increase such as Times 1.1.
Repeating Formulas
Use Repeating Formulas when you want to calculate how often a daily or weekly event will happen in a month. An example could be wages that are paid every 2 weeks. Or sales that you want to base on the number of weekdays in a month.
Using the Business Unit Layout when Editing Budget Formulas
Select Accounts in the left menu and choose an account to see all the business units. Tick one or more (or all) projects and then enter a formula to apply to them all. This is a great way to set the Cost of Sales as a percentage of Revenue for all your projects. Or Superannuation as a percentage of wages.
Copying Formulas
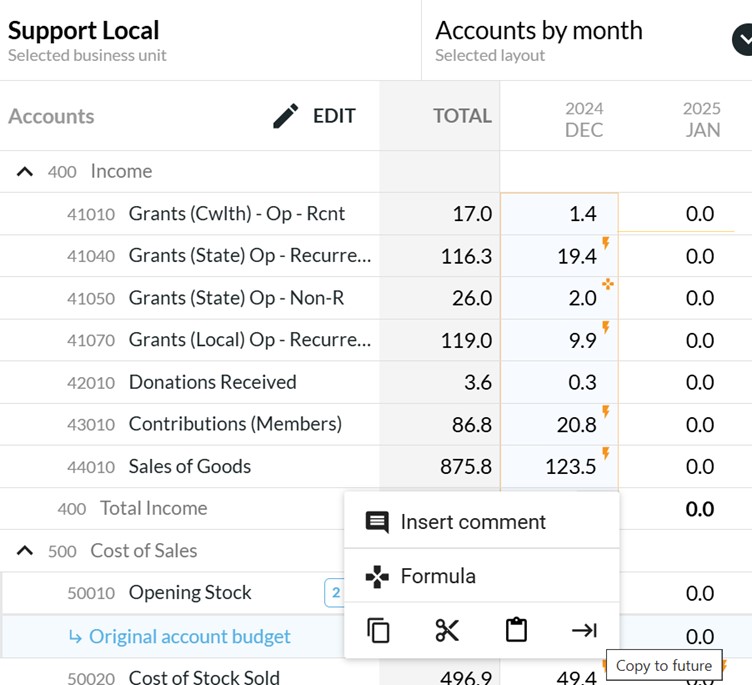
Now, there will be times when you enter a formula, and you want to copy it to future months. Say you’ve used formulas to calculate your 2024 budget, how do you copy those forward to 2025? Copy and paste only copies values but there is a method that’s just as simple:
- Expand your date range so it contains at least one month containing your old budget formula and the months you want to update. So, for calendar year 2025, you might choose December 2024 to December 2025, displaying 13 months.
- Select the cell for the account in December 2024 and, on the 3 dots at the bottom, choose Copy to Future.
- You can choose multiple accounts as long as they are all in sequence. Simply select them for December and again, use the copy to future icon.
Lock the Approved Budget
When you have finished editing your Calxa budgets, you might want to prevent it being edited in the future. Especially if it has been signed off by management or your board. You will find the ‘Lock’ functionality in the Budget Manager where you simply click on the padlock.
Layering your budgets
If you’re one of the people who likes to take a ‘divide and conquer’ approach to your budgets, try putting the bare minimum in your base budget and then build the rest step by step with scenarios. You’ll be able to mix and match until you have the right combination of options. At that stage, merge the scenarios into your budget for the year. Our Scenarios Guide will take you through that process.
Learn More Budget Editing Tips
To learn more about budgeting, download our Budgeting Tool Guide. We hope that some of these Calxa Budget tips will prove useful for you and your organisation.
If you have any questions about these budget editing tips, contact our Customer Success Team as they will be more than happy to help.