Since we introduced them more than 12 years ago, Account Trees have been one of the more popular features of Calxa. As with most areas, they have evolved and improved over that time. Maybe it’s time to stop thinking of them as Advanced and see the current version as the new normal. Regardless, here are some examples of how to use them to group, summarise and sub-total the rows in your management reports.
How to Use Advanced Account Trees
Here’s a selection of uses to give you some ideas.
1. Move Credit Cards to Liabilities
In some accounting systems, notably Xero, bank feeds are only available on Asset accounts. This means that many people set up credit cards and loans as Assets, when they should really be Liabilities. With our Account Trees, just drag the account from the Assets section to the Liabilities section where it rightfully belongs. Done!
You can move accounts between any account type within your Account Trees and we will ensure the accounting integrity is maintained.
2. Consolidating Multiple Companies
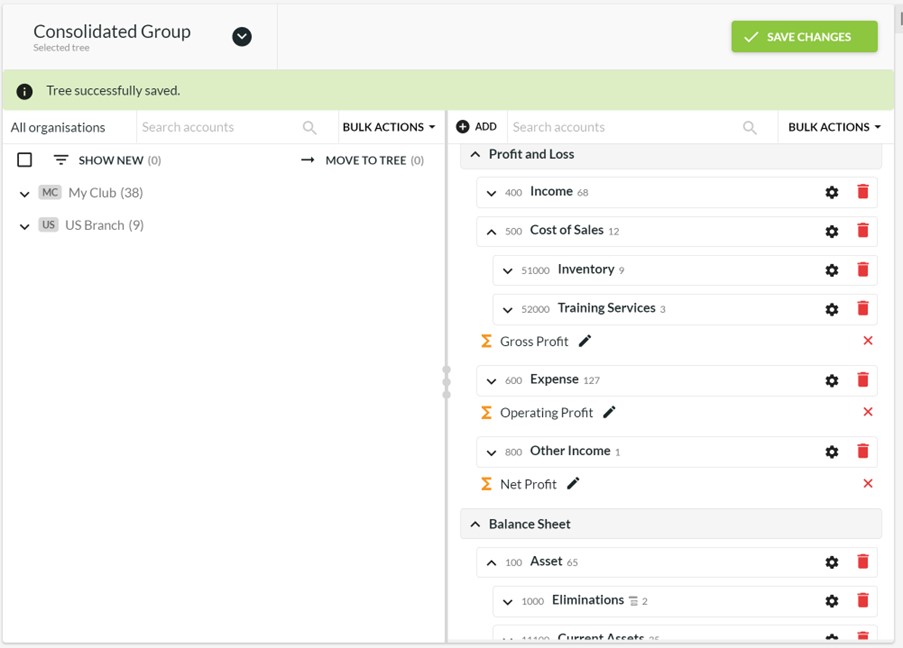
You only need one to cover the whole organisation group and can incorporate accounts from each company.
- Create the header structure you want for your Organisation Group, with multiple levels to suit your reporting needs
- Move the accounts from each entity onto the right header
- Save your changes and then add the Account Tree to the group when reporting
Inter-company eliminations are easily handled by a header account that’s set to Summary only. This ensures that it will only show on your reports if the amounts don’t add up to zero. If it does show on your reports, it’s an indicator that you’ve missed one side of a transaction.
The Trial Balance Comparison report is useful to review the values in the Elimination account for each entity side-by-side and troubleshoot any discrepancy.

3. Managing Departments in the Chart of Account
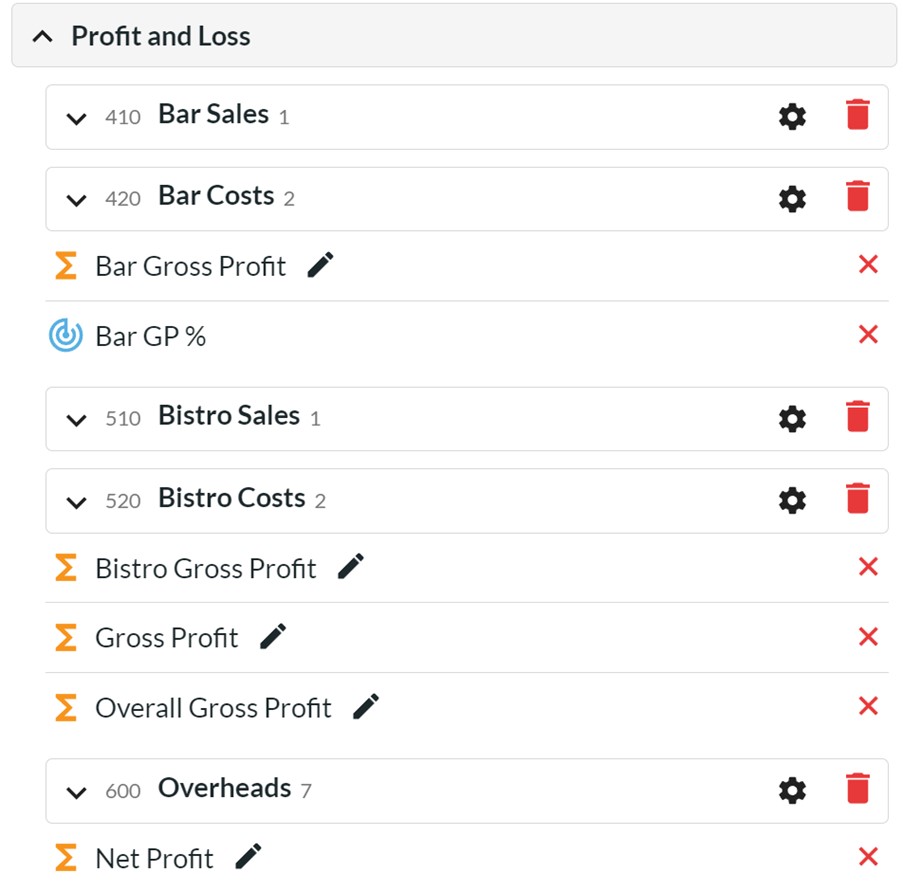
If you manage your departments through your accounts (rather than Tracking Categories or Jobs), create headers in the account tree for the department sections and then a calculation row for the Profit lines. For example, you could show something like:

You could have one tree that includes all the departments, as in the above example, or you could create one tree for each department. Think about whether you are reporting on them separately or all together to decide which option is best for you. An Account Tree doesn’t need to include every account.
Calculation rows, such as Bar Gross Profit or Bistro Gross Profit in the example above, can be as simple or as complex as you need. They can refer to any accounts above them in the Account Tree structure. For more complex calculations, simply use a KPI row.
Another scenario would be the change of standard accounting terminology. You can now rename anything at the Header level in your Account Tree. Your accounting system may have technical terms to suit compliance needs but an Account Tree can have more friendly headers that mean something to your audience. This includes the running totals like Income, Expense, Gross, Profit, Net Profit, etc. Change them to the wording that your audience is familiar with and make it easier for them to read and understand the reports.
4. Contribution Margin
While the standard Profit & Loss layout of Income, Cost of Sales, Gross Profit, Expenses, Operating Profit works well for many businesses, some want more. Especially in retail and manufacturing, it’s common to split the expenses into variable and fixed costs. The P & L would then show Income, Cost of Sales, Gross Profit, Variable Expenses, Contribution Margin, Fixed Expenses, Operating Profit.
You can now create this layout with Advanced Account Trees. Simply add a new Header for Variable Expenses with a Running Total for Contribution Margin. Rename the standard Expenses category to Fixed Expenses and move the detail accounts into the right section.
5. EBITDA
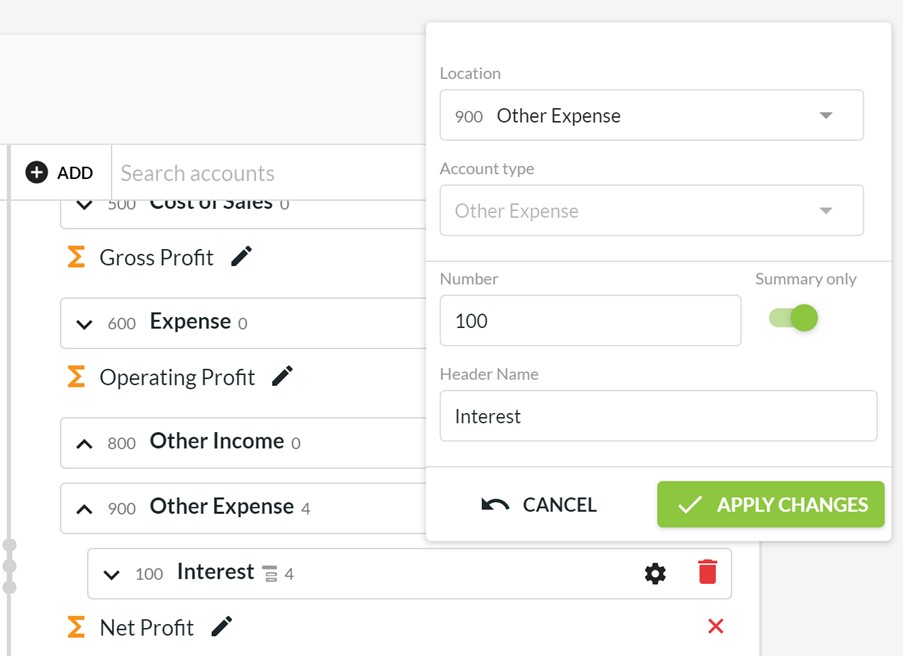
Many accountants (and some banks) love to include EBITDA (Earnings before Interest, Tax, Depreciation and Amortisation) as a sub-total in their reports. With our Account Trees, that’s easy in Calxa by creating a couple of new Headers. Set up one with a running total for EBITDA and one for the ITDA component. Then follow that with a calculation for NPAT (Net Profit after Tax).
6. Grant Reports to include Capital Purchases
Many of our Not-for-Profit customers need to report on grants. Sometimes, these grants include the purchase of capital equipment. Now you can move the Asset accounts into the Expense section and include their movements in your report. To get a better picture of how Calxa can help with grant reporting, have a read of our Streamlining Grant Acquittals.
Be careful not to use this same Account Tree for Balance Sheet reports as the changed Net Profit will affect the equity section. You can have as many account trees as you need so modify them to suit different purposes.
7. Summary Only Lines in your Management Reports
Sometimes in your management reports there are sections where you want to always show a single-line summary. To do this, add a new Header to your Account Tree, and make it Summary Only. The detail accounts under it will be summarised into one line. While your imagination is the limit, here’s a few more suggestions and ideas.
Summary of Accounts
As an example, you may have several accounts for motor vehicle expenses (fuel, registration, repairs, insurance, etc) but you just want to show one line for Motor Vehicle Expense. Make that the Header, drag the detail accounts under it and mark it as Summary Only.
If you’re using the Loan Wizard for your Calxa budgets, we recommend separate liability and expense accounts for each loan. This makes it much easier to reconcile and to make changes later. You may not want to show all the detail accounts in your management reports and a summary header solves this problem for you.

Handling Offset Accounts
Use a summary line anywhere you want to offset accounts such as matching income and expense lines. This could be for the purpose of grant reporting or when handling auspicing services. Simply, for any form of reconciliation reason.
This is also useful in a cashflow forecast report where you want to group the principal and interest components of a loan or expenses and their associated prepayments account or revenue and income received in advance.
Excluding Non-Cash Accounts
Use a summary line to exclude non-cash accounts from the Bank Movement or the Where Did our Money Go? reports. If the accounts total to zero, the line won’t show on your report. This could used for the likes of depreciation, amortisation or contra accounts.
Getting Started with Advanced Account Trees
If you haven’t used Account Trees before, you’ll find the setup under Reports, Report Tools. Then it’s as simple as applying this Account Tree on the reports.
One final quick tip for you. If you are sharing Calxa with colleagues, you can restrict their access to editing Account Trees in the user permissions.
