
While the Statement of Cashflows is a popular report amongst accountants, it’s not generally so well understood by business owners and managers. This report identifies actual cashflow on the main bank accounts and breaks this analysis down to operating, investing and financing activities.
Statement of Cashflows: Using Direct or Indirect Method
There are two methods you can use: Direct or Indirect.
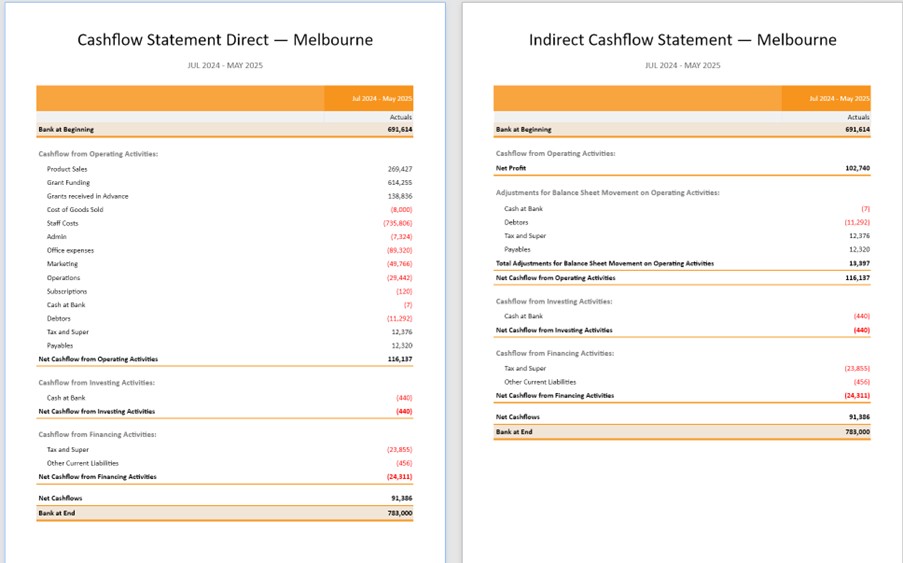
Direct Cashflow Statement
The direct method of presenting the Statement of Cashflows starts with Cashflow from Operating Activities. Essentially, here it lists changes in cash receipts from customers and cash payments to suppliers. In common with most accrual accounting systems, Calxa does this by including movements in Receivables and Payables with the income and expenses.
This is then followed by Cashflow from Investing Activities. This is mostly changes to assets such as the purchase (or disposal) of equipment. Cashflow from Financing Activities shows how you have funded the business in this period. Notably, it mostly relates to movements in liability and equity accounts.
Indirect Cashflow Statement
Using the indirect method means the operating activities are calculated by starting with Net Profit. It then looks for non-cash activities. After that it adjusts for balance sheet changes such as Debtors and Creditors.
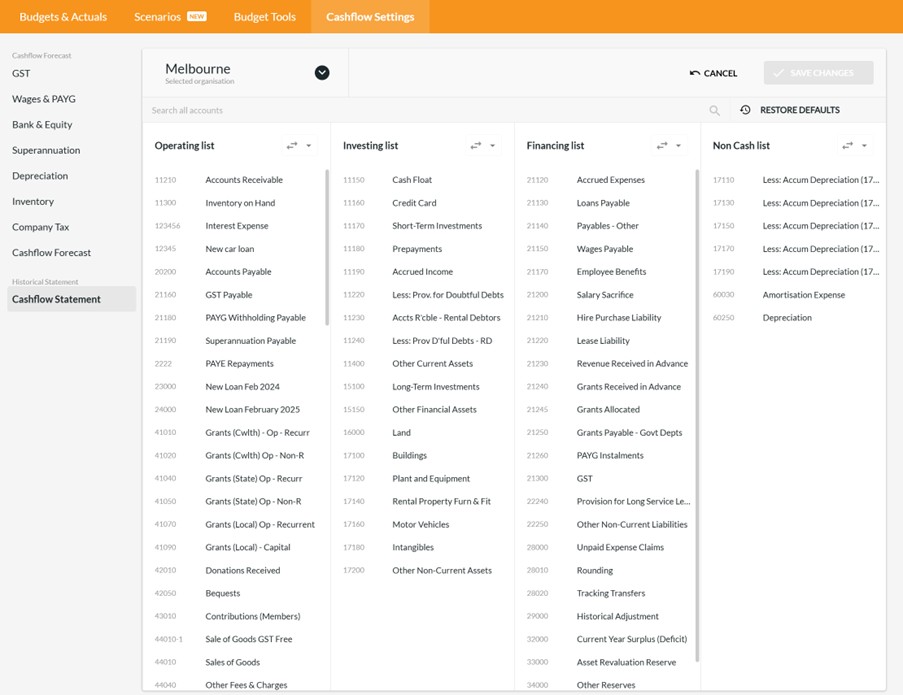
Step 1 – Categorise Accounts
This particular report categorises cashflows as:
- Operating,
- Investing
- Or Financing.
You will need to check this allocation in Budgets & Cashflow, Cashflow Settings, Cashflow Statement. We provide you with a default breakdown but you should review that to make sure it makes sense for your business.
You can simply drag accounts from one list to the next or use Ctrl with a left mouse click to move multiple items at once.
Step 2 – Ensure Non-Cash Accounts are Balanced
One of the categories in the financial settings is Non-Cash. Since the statement of cashflows identifies cashflows, these accounts are excluded. However, if the sum of the Non-Cash accounts does not balance to zero (equal debits and credits) then the net cashflows in the report will not balance with the opening and closing bank.
We will add a discrepancy line if there is an imbalance. Use the Cashflow Statement Discrepancy Analysis report (found in the Troubleshooting section of the Report Builder) to help identify the problem accounts.
Generally, this is simply a case of ensuring each account has a matching pair. For example, depreciation expense should have a matching accumulated depreciation account nominated.

Step 3 – Create Account Tree for Summarising
Traditionally the statement of cashflows report is a summary level report that does not necessarily rely upon the naming or groupings from your chart of accounts. In this report however, Calxa will be using your account numbers and names for grouping and ordering. The Account Level in the report criteria can be used to show or hide detail. However, you may also wish to create an Account Tree with custom groupings. For example, you could group accounts by Payments on long-term loans or any other categories that may help to summarise and make the report more readable.
Step 4 – Run the Report
Now that the prep work is done you should be able to confidently run the Statement of Cashflows report time and time again. Be sure to check the discrepancy row to ensure the report is accurate. There is no right or wrong about using the Direct or Indirect method. The best one is the one that helps you understand what’s happening in the business.
For a detailed look at each of these steps review our help article on this topic.
You can find more information on how Calxa can help you with your business cash flow on our Cash Flow Forecasting solutions page.